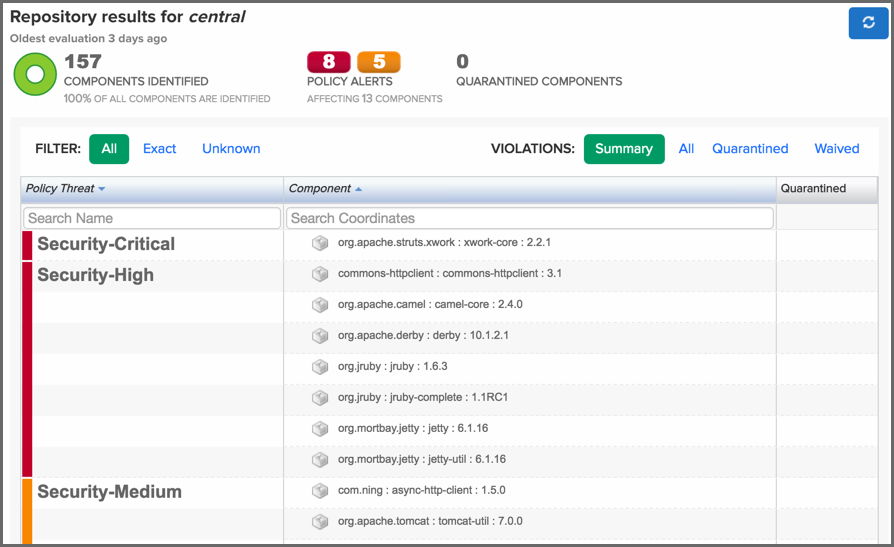
The Repository Results are displayed on IQ Server. They contain detailed information about policy violations and the components that violated those policies, as well as components that don’t have violations.
At the top of the Repository Results view (shown in the figure above) is a summary section with the following information:
Below the summary section is a list of policy violations and the components that violated those policies. By default, this information is ordered by the highest policy threat level. You can refine the list using one of the following filter categories:
|
|
|
|
You can update the audit results for the entire proxy repository by clicking the Re-evaluate Policy button in the upper right corner of the Audit View. This is useful especially after an associated policy is added or modified on IQ Server. However, it may take some time, if the repository is large. During re-evaluation any previously quarantined components remain quarantined, no matter whether they still violate policy. With quarantine enabled, if you delete a quarantined component, its quarantine status is also deleted. If you add the component back in, it is evaluated again just like any new addition to the repository. Currently the only way to remove a component from quarantine is to change the policy accordingly, then delete and add back the component. Also, whenever you add or delete a component in the proxy repository, the audit results are automatically updated for the individual component only (not the entire repository). |
When you click an individual component in the Repository Results, the Component Information Panel (CIP) opens with the Component Info tab displayed.
Component Info
This tab contains the same granular details about an individual component as the Component Info tab in Nexus Repository Manager. For an explanation of those details, see Component Info earlier in this chapter.
Policy
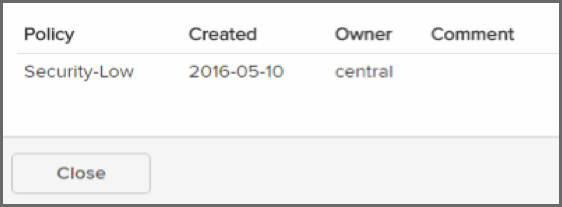
The Policy tab displays all policies that were violated by a component. Here you can see the name of the policy that has been violated (and any action that was taken), the name of the constraint that has been violated, and the value that was found.
While the Policy/Action and Constraint names are straight forward, the Condition Value may be a little confusing at first. A condition is simply the if part of an if/then statement. If a certain condition value is found which is equivalent to a condition being met, then the policy will be violated. E.g. if we have a policy that has a condition such that if a security vulnerability is found, our Condition Value column would indicate, Found x Security Vulnerabilities. In the same regard, Constraints are simply multiple conditions joined together.
The Policy Tab. image::figs/web/audit-view-policy.png
Licenses
The Licenses tab displays all Effective licenses, any licenses identified as declared by the author of the component, as well as any license found during the scan of the component source code. It also allows you to override the Effective license. To do this:
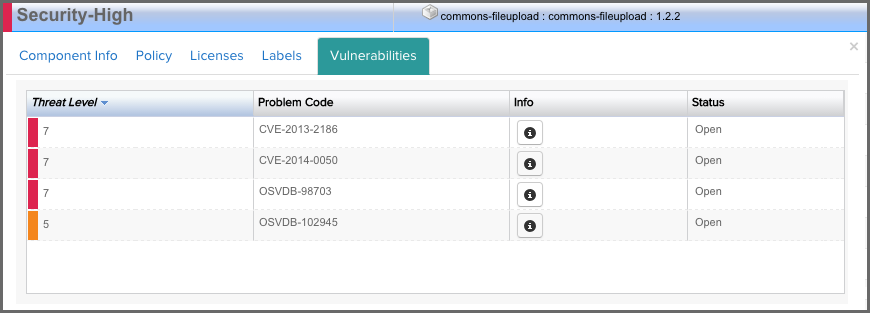
Vulnerabilities
The Vulnerabilities tab displays all security vulnerabilities related to a component. The list of vulnerabilities is sorted by Threat Level from higher to lower risk. The Problem Code column displays unique identifiers obtained from security information web sites such as CVE and OSVDB. The Info button provides additional information about each security vulnerability. Lastly, the Status column tracks the state of your research regarding the vulnerability.
If desired, you can change the security vulnerability status of a component in a proxy repository. This can help you keep track of your research when you investigate any security vulnerabilities identified by IQ Server.
To change the security vulnerability status of a component:
In the Status list on the right, select one of the following settings:
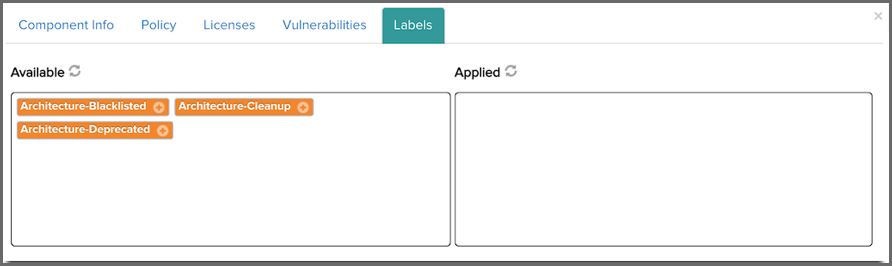
Labels
The Labels tab displays any component labels that have been defined previously at the root organization level on IQ Server. Component labels are metadata that is assigned to a component within the context of a particular application or organization.
Assigning a Label
When assigning a label, you will only see labels defined on the root organization.
To assign a label:
Click the Label option from the CIP menu. Two boxes are displayed:
When applying a label, you have the following options:
Policy violations for components found in your repositories can be waived with a number of options for the scope and target of the waiver. As with all features, make sure to verify you have the appropriate level of access provided by the role you have been assigned.
|
|
|
|
Waiving policy violations for components in your repository is different than waiving for an application. See Section 11.9.2, “Adding a Waiver” for additional information on waiving components at that level. |
A dialog is displayed with the following settings:
Determine the scope of the waiver:
Determine the targeted component of the waiver:
|
|
|
|
Waivers will not be applied until a re-evaluation of the Repository Results has occurred. This will occur automatically if the targeted component is left to the default settings (i.e. not set to All). In cases where the selected component is set to All, a manual re-evaluation will need to occur for any results previously applying the violation. |