Roles provide a set of permissions that grant various levels of access and control over the IQ Server as well as
the connected suite of tools. To grant permissions, you assign a user to either a system-wide administrator role
or an organizational role at one of the levels in the system hierarchy: root organization, organization, or
application. Which role and level you choose for a user determines what permissions that user receives.
You can assign roles to individual users or groups of users. IQ Server has a built-in group called Authenticated
Users that contains any authenticated user. In addition, LDAP groups may be available, if you configured
IQ Server to use an LDAP server with users mapped to specific groups.
6.5.1. Viewing Built-in Roles
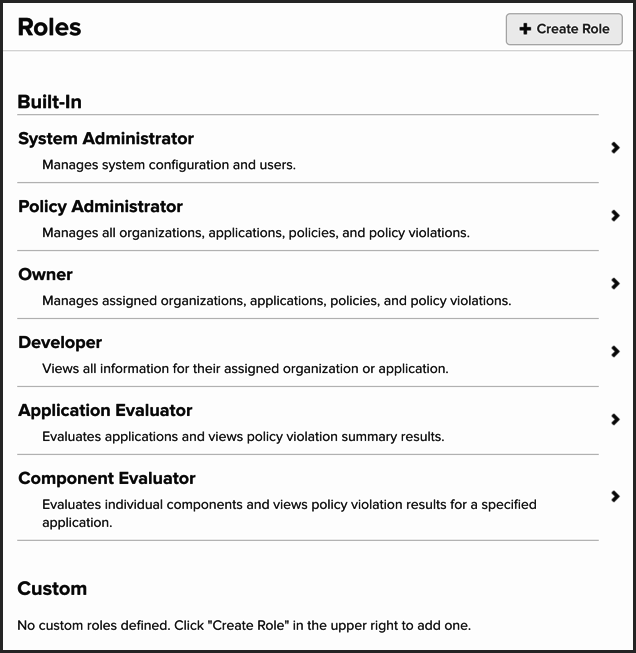
IQ Server has several built-in roles, which are shown below. If one does not suit your needs, you can create a custom role.
-
Administrator Roles
-
-
System Administrator - Manages system configuration and users, which
includes LDAP and product license management as well as the ability to assign
other users to the System Administrator role.
-
Policy Administrator - Provides full control over organizations, applications,
policies, policy violations and custom roles. Only the Policy Administrator has
the ability to create organizations.
-
Organizational Roles
-
-
Owner - Manages assigned organizations, applications, policies, and policy
violations.
-
Developer - Views all information for their assigned organization or
application.
-
Application Evaluator - Evaluates applications and views policy violation
summary results.
-
Component Evaluator - Evaluates individual components and views policy
violation results for a specified application.
To view roles in IQ Server:
-
Click the System Preferences icon on the IQ Server toolbar.
-
Click Roles on the System Preferences submenu. A list of built-in roles
is displayed.
![[Warning]](images/icons/warning.png)
|
|
|
Only a user assigned to an administrator role can see the information
below. If you are using the built-in Admin user account, it is assigned to all
administrator roles. It is highly recommended that you change the Admin
password.
|
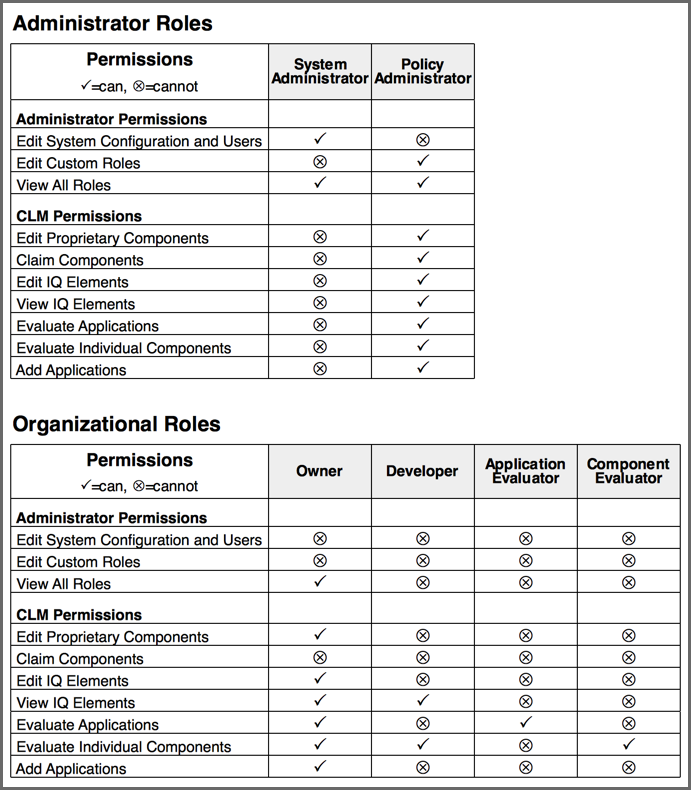
6.5.2. Viewing Permissions of Built-in Roles
To view permissions assigned to built-in roles:
-
Click the System Preferences icon on the IQ Server toolbar.
-
Click Roles on the System Preferences submenu. A list of roles is
displayed.
-
Click the arrow next to a specific role to view its details and permissions.
The built-in roles have the permissions shown below.
![[Note]](images/icons/note.png)
|
|
|
IQ Elements includes organizations, applications, policies, component labels, license threat groups,
application categories, policy violations and waivers.
|
6.5.3. Understanding the Importance of Hierarchy
The scope of permissions granted to a role is governed by where that role is
assigned in the system hierarchy. A role assigned to:
-
Root organization - Grants permissions to all organizations, applications, and repositories.
-
Organization - Grants permissions to that individual organization and any
applications attached to it.
-
Application - Grants permissions only to the individual application.
Firewall solution users have an additional entity for which roles can be assigned:
-
Repositories - Grants permissions to repositories.
6.5.4. Managing Administrator Roles
To manage administrator roles, you must log into IQ Server as a user assigned to the System Administrator role. By
default, the built-in Admin user account is assigned to the System Administrator role.
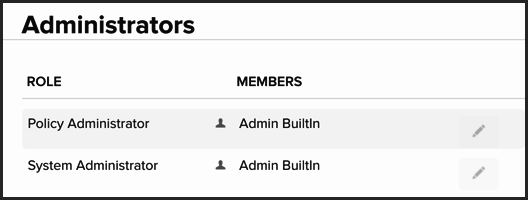
Viewing Administrator Roles
-
Click the System Preferences icon
 on the IQ Server toolbar.
-
Click Administrators. A list of administrator roles and assigned members is displayed.
Assigning Users to Administrator Roles
-
Click the System Preferences icon
on the IQ Server toolbar.
-
Click Administrators. The Administrators view is displayed.
-
Click the Edit Role button (looks like a pencil) for the role to which you want to add users. The
Administrators view is updated to display the role and its members
-
Search for a user you want to add to the role by entering a full name or part of a name with an asterisk into
the search box, then click Search. You can use an asterisk as a wildcard at the beginning or end of a character
string. For example, isa*, *mov, and *asi* will all match the name, "Isaac Asimov." Any matching names
are displayed in the Available list.
-
To add a user to the role, click a user’s name in the Available list to move the name to the Applied
list. To remove a user from a role, click a user’s name in the Applied list to move the name to the
Available list.
-
Click Save to save the role assignment(s).
6.5.5. Managing Organizational Roles
To manage organizational roles, you must log into IQ Server as a user assigned to the Policy Administrator role or
Owner role. By default, the built-in Admin user account is assigned to the Policy Administrator role.
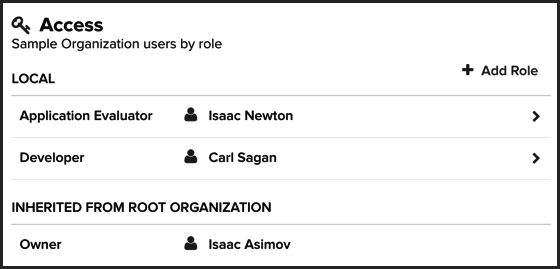
Viewing Organizational Role Assignments
To view organizational role assignments:
-
Click the Organization & Policies icon
 on the IQ Server toolbar.
-
Select an entity (organization, application, or Repositories) in the sidebar.
-
Click Access in the menu bar at the top of the page to scroll to the Access section. Assigned roles are
grouped as follows:
-
Local - Role assignments with a scope that’s specific to the selected organization or application.
-
Inherited - Role assignments derived from an organization that’s higher in the system hierarchy than the
currently selected organization or application.
Assigning Users to Organizational Roles
To assign a user to an organizational role:
-
Click the Organization & Policies icon
on the IQ Server toolbar.
-
Select an entity (organization, application, or Repositories) in the sidebar.
-
Click Access in the menu bar at the top of the page to scroll to the Access section.
-
Click the Add Role button. The Access editor is displayed.
-
In the Role box, select a user role.
-
In the Search Users box, search for a user by entering a full name or part of name with an asterisk, then
click Search. You can use an asterisk as a wildcard at the beginning or end of a character string. For
example, isa*, *mov, and *asi* will all match the name, "Isaac Asimov." Any matching names are
displayed below in the Associated Users list.
|
|
|
|
If you integrated an LDAP server with IQ Server, the LDAP users and groups are also displayed in the search
results. If you hover over a list item, the LDAP realm and email address are displayed when available.
|
-
In the Associated Users list, select a user in the Available column on the left, then click the right arrow
button to move the user to the Associated column on the right. If you accidentally add a wrong user, select the
user in the Associated column, then click the left arrow to return the user to the Available column.
-
Click Add.
![[Tip]](images/icons/tip.png)
|
|
|
If you want to continue adding role assignments for the selected organization, application or Repositories,
click Add Role in the sidebar.
|
Editing Organizational Role Assignments
To edit an organizational role assignment:
-
Click the Organization & Policies icon
on the IQ Server toolbar.
-
In the sidebar, select the entity (organization, application or Repositories) in which the role is assigned.
-
Click Access in the menu bar at the top of the page to scroll to the Access section.
-
Click a listed role (or the chevron next to its name) to display the Access editor.
-
In the Search Users box, search for a user by entering a full name or part of name with an asterisk, then
click Search. You can use an asterisk as a wildcard at the beginning or end of a character string. For
example, isa*, *mov, and *asi* will all match the name, "Isaac Asimov." Any matching names are
displayed below in the Associated Users list.
|
|
|
|
If you integrated an LDAP server with IQ Server, the LDAP users and groups are also displayed in the search
results. If you hover over a list item, the LDAP realm and email address are displayed when available.
|
-
In the Associated Users list, you can add a user to a role by selecting the user in the Available column on
the left and clicking the right arrow button to move the user to the Associated column. To remove a user from a
role, select the user in the Associated column, then click the left arrow to return the user to the Available
column.
-
Click Update.
|
|
|
|
If you want to continue editing role assignments for the selected organization, application or Repositories,
click a desired role in the sidebar.
|
Removing Organizational Role Assignments
To remove organizational role assignments:
-
Click the Organization & Policies icon
on the IQ Server toolbar.
-
In the sidebar, select the entity (organization, application or Repositories) in which the role is assigned.
-
Click Access in the menu bar at the top of the page to scroll to the Access section.
-
Click a listed role (or the chevron next to its name) to display the Access editor.
-
Click the Remove Role button, then click Continue to remove the role or click Cancel to keep the role.
|
|
|
|
This is the equivalent of removing or disassociating all users from a role.
|
6.5.6. Creating Custom Roles
![[Important]](images/icons/important.png)
|
|
|
You must have permission to Edit Custom Roles if you want create a
custom role. The default Admin account and the built-in Policy Administrator role
have this permission.
|
Custom roles allow you to fine tune IQ security permissions for different users. The following permissions are
available for custom roles:
-
Administrator Roles
-
-
View All Roles
-
Edit Proprietary Components
-
Organizational Roles
-
-
Claim Components
-
Edit IQ Elements
-
View IQ Elements
-
Evaluate Applications
-
Evaluate Individual Components
-
Add Applications
|
|
|
|
To achieve desired behavior in the IQ user interface, you may need to assign View IQ Elements along with
other permissions. For example, to allow a user to create applications in an organization but not edit the
organization, you should add View IQ Elements and Add Applications to the role.
|
To create a custom role:
-
Click the System Preferences icon on the IQ Server toolbar and then
click Roles.
-
Click the Create Role button.
-
Enter a name and description for the role.
-
Click the Can/Cannot slider to enable or disable a permission as desired.
-
Click the Save button.
|
|
|
|
Whenever a user assigned to a custom role with Add Applications permission creates an application, that
user is automatically assigned to the Owner role for that application.
|
6.5.7. Assigning Groups to Roles without Searching
If you have an LDAP configuration that prohibits searching for groups, then the Access editor will have an
additional section called Associate Group. You can use this section to enter manually a group name and add it
to a role.
To assign groups to roles without searching:
-
Click the Organization & Policies icon
on the IQ Server toolbar.
-
In the sidebar, select an entity (organization, application or Repositories).
-
Click Access in the menu bar at the top of the page to scroll to the Access section.
-
Open the Access editor by clicking Add Role or the chevron next to an existing role.
-
In the Associate Group box, enter the group name. The text must be an exact match.
-
Click Add. The group name is added to the Associated column without performing a search of users and groups.
6.5.8. Viewing Role Assignments
To view role assignments:
-
Click the Organization & Policies icon
on the IQ Server toolbar.
-
Select an organization or application in the sidebar. A page of customizable settings is displayed.
-
Click Access in the menu bar at the top of the page to scroll to the Access section. Users are displayed by
their assigned roles for the selected entity (i.e. organization or application). The information is grouped by
where the role assignments were made: locally in the current entity or inherited from an entity higher in the
system hierarchy.