Documentation Nexus IQ Server 1.19

Our documentation site has moved. For the most current version, please see http://help.sonatype.com

7.4. Importing Policy

Setting up policies can be quite complex and labor intensive. To make the process easier and give you a head start we have created some sample policies and provide an import feature.

We actually recommend you don’t begin by creating a bunch of policies right out of the gate. Instead, we’ve created a set of policies, which include other policy elements such as labels and license threat groups, that you can import into the IQ Server.

Eventually, and there is a very short time between now and eventually, you will need to create, or at least modify, policies. For now, we’ll want to focus on populating your organizations and applications with the sample policy set.

7.4.1. Sample Policy Set

The sample policy set can be downloaded here:

Sonatype-Sample-Policy-Set.json

This policy set is an example of managing components for security, licensing, and architectural issues. It also introduces the detection of unknown and patched components used in building your applications. The sample policy set can be used to gather information about the components used to build your applications without warnings and failures occurring in the developer, build, or Nexus environments.

This is the perfect set of policies to use in order to gather information and understand how policy management will work for your environment, without potentially distracting the people who are building and delivering your applications.

[Note]

The sample policy set includes several, preset tags. The tags have been used in the Application Matching area for a number of the included policies. Policies using the tags will be indicated by a special tag icon. In order to utilize the policies, you must have applied the corresponding tag to your application(s). For more information on tags, please see the Tags section of the Advanced Policy Management chapter.

7.4.2. Importing Policies to an Organization (Including the Root Organization)

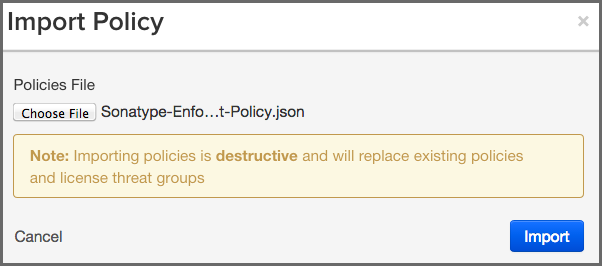
Once you have acquired the policy file to import, you can follow these steps:

  1. Log into the IQ Server with a user account that has proper permissions to import policy for a specific organization (at least a member of the owner group for the organization would be required).
  2. Next, click the Organization & Policy icon figs/web/clm-server-manage-app-org-icon.png to access the Organization & Policy area.
  3. Click on Organizations in the left menu, and then click the organization you wish to import the policy to.
  4. Click the Import button in the top right corner of the organization view displayed in Figure 7.2, “Organization View with Import Button”.
  5. Click the Choose File button in the Import Policy dialog displayed in Figure 7.3, “Import Policy Dialog” and select the policy JSON file in the file browser.
  6. Click the Import button in the Import Policy dialog.
  7. Confirm that the list of policies contains the imported policies.
figs/web/clm-server-org-policy-import.png

Figure 7.2. Organization View with Import Button


If you are importing to an organization, that already has some policies, labels, license threat groups, and/or tags set up, consider the following rules:

  • Existing policies will be deleted during the import procedure.
  • Importing policies also includes an import of associated policy elements (labels, license threat groups, and tags). The following logic will be used for Policy Elements:

    • Labels - the IQ Server attempts to match labels against existing ones in a case-insensitive manner. This allows for updating the description or color of existing labels, while preserving any triage effort already done to apply these labels to components. If your import contains labels that aren’t already present in the system, they will be created.
    • License Threat Groups - the IQ Server will delete all existing license threat groups, and then import the new ones.
    • Tags - the IQ Server attempts to match tags against existing ones in a case-insensitive manner. This allows for updating the description or color of existing tags, while preserving any current matching of tags between policies and applications.
figs/web/clm-server-policy-import-dialog.png

Figure 7.3. Import Policy Dialog


7.4.3. Importing a Policy to an Application

An application inherits policies from the organization. However it can be useful to have additional policies for fine grained control.

  1. Log into the IQ Server with a user that has been assigned to the CLM Administrator role, or an Owner role for the application you wish to import policy to.
  2. Next, click the Organization & Policy icon figs/web/clm-server-manage-app-org-icon.png to access the Organization & Policy area.
  3. Two columns will be displayed on the left. Click on Applications, and then click the application you chose to import the policy to.
  4. Click the Import button in the top right corner of the application view, which is identical to the organization view displayed in Figure 7.2, “Organization View with Import Button”.
  5. Click the Choose File button in the Import Policy dialog displayed in Figure 7.3, “Import Policy Dialog” and select the policy JSON file in the file browser.
  6. Click the Import button in the Import Policy dialog.
  7. Confirm that the list of policies contains the imported policies.

The policy information will be imported, and the following rules will be applied:

  • Duplication of organization policies is invalid, so you will not be able to import the same policy file into an organization and then into an application associated to it.
  • When a policy is imported, any existing application policies will be deleted and replaced with the imported configuration.
  • For label imports, the same logic as during imports at the organization level described in Section 7.4.2, “Importing Policies to an Organization (Including the Root Organization)” applies.
  • Attempting to import policies that contain tags will cause the entire import to fail.