Policy can be created at three different levels:
Creating a policy is rather simple:
However, before you begin creating your own custom policies, it’s a good idea to write out the policies you want to create, and think about where in your development lifecycle you may want to enforce available actions.
In addition, there are a few elements that will need to be in place as well:
Over the next few sections we’ve outlined a multi-step, sample process that takes you through the major steps of creating a policy. These instructions follow the process for creating a policy for an organization. This is where most of your policies will be created. However, if you need to create a policy for the Root Organization, or a specific application, just substitute those entities accordingly.
|
|
|
|
If you have access to the Audit and Quarantine features of Nexus IQ for Repository Manager, policies for your repositories are managed at the Root Organization level only. They do not require a specific application or organization. |
Building on items we mentioned in the introduction, a good first step is to think about the intent of the policy we are going to create. Here are some questions to consider:
These questions are really just the start, but in short you should think about what scenarios should produce a violation, and what action should be taken. For our example policy, we want to focus on a policy that could be used to address architecture, specifically, the Age and Popularity of components our development organization could use, or is already using.
Since architecture is our focus we are going to use it as part of the name for our policy. In addition we are going to add Age and Popularity to the name to be more specific. This will help us later when we start creating additional architecture related policies. Lets go ahead and create this policy:
Threat level is one of the easiest concepts we’ll cover in this chapter, yet it has the greatest chance to cause huge problems. At it’s core, this is simply a value for severity your business associates with a given policy. These values range from 1 to 10, each corresponding to range of severity, and a specific color:
Table 7.1. Threat Levels
|
High |
Red |
8-10 |
|
Medium |
Orange |
4-7 |
|
Low |
Yellow |
2-3 |
|
Informational |
Dark Blue |
1 |
|
None |
Light Blue |
0 |
To assign threat level to a policy, you will need to be in the policy edit mode (click on the editing icon). Next, use the drop down, which is located next to policy screen. This is displayed in Figure 7.5, “Editing the Policy Threat Level”.
Threat level also impacts the default display in many IQ Server reports and views. More specifically, any component that has violated a policy will be displayed, ordered by threat level of the violated policy. This is straight forward, but let’s take a look at the details and see where some issues can arise.
Just like taste is subjective, you have to realize that threat level is subjective. What may be a level 10 for one part of the business may be quite different for another.
A bigger concern is what message you want to communicate to the recipients of the analysis. For example members of your team will naturally be inclined, to treat high severity as very important, and critical. If they see too many of these, the prospect of ever making any headway could be impacted in a negative way and you might dismay e.g. your developers to even get started on trying to fix the violations since there are just too many. As with any control mechanism it is probably advisable to be a bit lenient at first and start to get stricter at a later stage, when the worst problems are dealt with. Otherwise you could cause undue stress to development and management teams. The important thing is to keep in mind is how you will assign severity, and the impact it has on those reviewing violations.
Especially in the beginning, our recommendation is to reduce, if not exclude the high severity threat levels altogether. Remember, at the core, this number is purely for ordering how a violation will be displayed to a user reviewing the results of an evaluation (e.g. in the Application Composition Report). Because this needs to be interpreted, the actual value is very subjective. It’s easy to overwhelm members of your team by seeing large numbers of highly severe violations. It might even be reasonable to set severity to the lowest setting for a violation (Low - 1) in the beginning. This way, members of your teams can get used to seeing the results that are produced.
In our example policy, architecture quality is pretty important, but it’s not the most important issue, so we’ll leave the default threat level of 5. This will give us a violation higher up in the display, but it’s certainly not the worst.
|
|
|
|
Remember, threat level is subjective, and is most useful for ordering violations. |
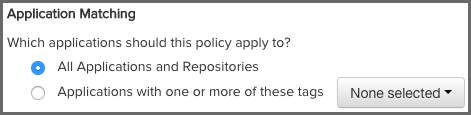
There are two key options for matching a policy:
|
|
|
|
One exception exists to the options listed above: In the case of the Root Organization, the option to match all will also include "repositories". This will impact the policies used as part of the Audit and Quarantine features of Nexus IQ for Repository Manager. |
Given the ability to create tags, there is an endless amount of refinement that can be done in order to focus a particular policy on a set of applications with similar characteristics. While we won’t get into the creation of tags here, thinking about this as a way to create more finely tuned policy is a good first step.
For now, you can assume pretty generalized architecture requirements for all components. That is, focus on creating a policy that could be used throughout the development organization.
By now, we should know that an easy way to look at conditions is to consider
them the if part of an if/then statement. In contrast, a constraint is not
part of the statement, but rather a container for conditions. This can come in
real handy when you want to consolidate a policy, by grouping similar
conditions.
But why do this?
Well, for one thing, it reduces time. Next, because constraints are displayed on the Application Composition Report, along with violations, it becomes easier for a member of your team to process information that is similar. Of course, it also has the added benefit of not having to create hundreds of small, one-off policies.
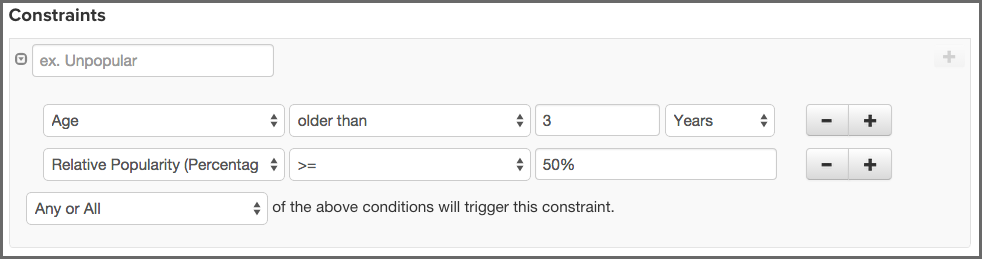
For example, in our Architecture Age and Quality policy, we may start with two conditions, one for age and one for popularity. This will work, but it’s likely better, especially if we want to expand that later on, we isolate these as separate constraints.
As a good practice, grouping similar conditions is the best way to build your constraints. For our example, we’ll be placing both conditions in the same constraint. Again, this will help de-clutter a multi-policy environment, as well as help someone trying to understand any associated violations displayed in the various views and reports.
To add a contraint:
Using the drop downs and the add (+) button, add two conditions.
Now, before we move on, let’s take a look at some of the specific aspects of conditions that can tend to be a bit confusing.
Policy Type. A simple algorithm is used to automatically determine the type of policy you created. It is based on the types of conditions you include and is mainly used for reporting purposes. The rules to determine the type of a policy are:
Any vs. All. If a component meets any constraint, the policy is considered violated. However, inside each constraint, when you have more than one condition, you have the ability to require that a component must either meet all conditions or just any of the conditions to trigger a violation.
This is a straightforward concept, but it can produce vastly different results. For example, selecting Any as an option will tend to produce a lot more violations, it’s the equivalent of placing an or between each condition. In addition even if you resolve one violation for a component, if the component meets other conditions later on, it might cause it to still violate the policy. On the other hand, using All' allows you to establish that all conditions must be met. It’s like placing an and between each condition. In this case, if you address any of the conditions, the violation will be resolved.
Let’s look at an example that would further explain this, and then we will move on to creating conditions in our policy. Below, we have a couple of policies and a component. If we wanted to exclude components that were younger then four years and had less than fifty percent popularity, which would we want to use? Also, would the component listed violate this policy?
It may seem like these two policies are exactly the same, but there is a key difference, Any vs. All. So, our first policy states that if Any of the conditions are met that a violation will occur. Given that, our component violates this policy. This is good, but we only want a component to violate a policy when Age is less than three years, and popularity is below 50%. We understand that there may be circumstances where a component might need to fall outside one of those boundaries, but if it’s both, we know we have a problem. Our component is pretty popular, so it might be a case where this component, even though it is newer than we prefer, actually resolves an issue another component might have. For this reason, the best policy for us to choose is Policy 2, and our component would not actually cause a violation.
Verify if the coordinates for a component match or do not match (e.g. groupId:artifactId:version).
The coordinates may be fixed, or a wildcard can be used. For example, org.sonatype.com:nexus-indexer:1.*. Here, components with a groupId of org.sonatype.com, an artifactId of nexus-indexer, and any version starting with 1. would be matched.
|
|
|
|
This condition is only applicable for Maven components. |
|
|
|
|
The use of the wildcard is limited to the end of each parameter in the coordinate. |
Now that you know about all the available conditions and how they can be combined to match all or any condition to create a constraint we are ready to determine what should happen if a constraint is met - the policy actions.
Policy actions and notifications allow you to perform a specific function when violations occur. In some cases this can include forcing a particular action in one of tools that interact with the IQ Server (e.g. Nexus Pro+.
Alternatively, notifications can be set so that when violations occur, any combination of particular email addresses, or the email addresses associated with the members of a particular role, will be notified.
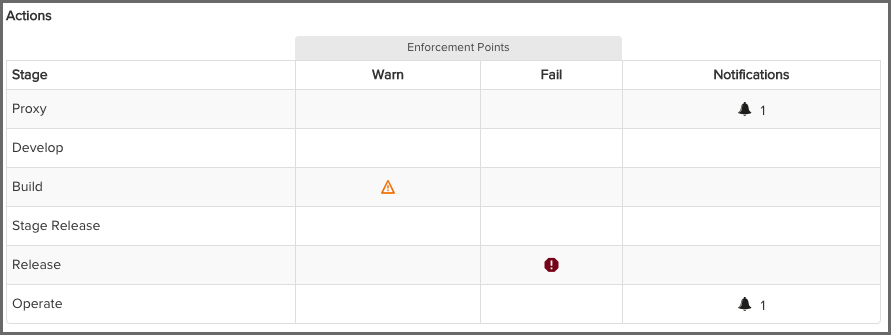
Actions. Actions are organized by enforcement point, and enforcement points simply represent a stage in the development lifecycle of an application (e.g. Development).
For each stage there are two degrees of action you can assign to each enforcement point:
To add actions:
First make sure you have:
|
|
|
|
Take care in being too anxious to stop your development cycle using Fail. |
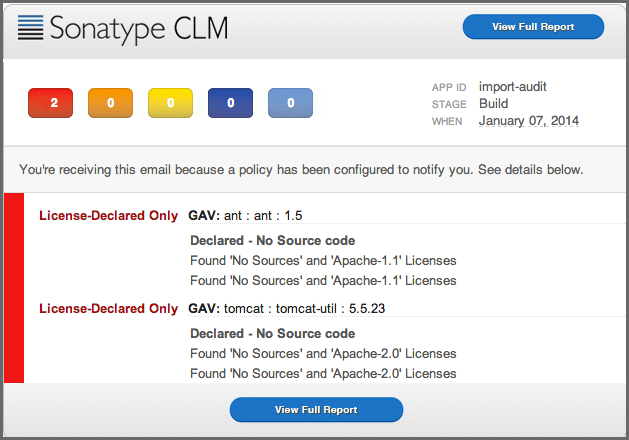
Notifications. When a new violation occurs, a notification will be sent. This includes any email addresses entered manually, as well as email addresses for the users that have been added to any roles selected.
To add notifications:
|
|
|
|
When a notification is sent, it will only display new violations found in the latest evaluation. If you find yourself not receiving notifications, verify there are new violations, as well as confirm you have configured your IQ Server SMTP settings. |
Stage. Both actions and notifications are set by stage. Each stage represents a point in the development lifecycle. If you have connected the IQ Server with an external tool (e.g. Nexus Pro+) the action and notification can be applied and could have direct effect on the tool. For example, a release can be prevented in Nexus Pro+). To better understand how actions and notifications can be used, a suggested action has been provided for each stage.
Proxy refers to "Proxy Repository", or the point where components enter your repository manager. This is also referred to as the repository integration point. For more information on how to use the repository integration point, please review the Nexus IQ for Repository Manager chapter.
When setting actions, Warn will have no effect on what happens to components in the repository. However, if you have enabled Quarantine on a repository, and set the action to Fail, any new components added to the repository will be quarantined (unavailable via the Repository Manager).
|
|
|
|
Quarantined components will not be available to your development team, including any attempt to build existing projects using those components. |
Similar to Stage Release make sure all stakeholders, that is those members responsible for ensuring an application does not go into production with policy violations, are notified.
|
|
|
|
If you have setup policy monitoring, it is a good idea to monitor your release stage, as this is likely the best representation of your production application. |
At some point, the application your team is developing will be out of development, have completed its final build, moved beyond staging, and have been officially released. However, while there shouldn’t be changes to your application that is now considered to be in production, new security vulnerabilities and license issues could arise. To address this, you can monitor individual applications for any new policy violations.
The setup for policy monitoring is straightforward. In general you will likely want to avoid monitoring every single policy. Not only is that a lot of policies to monitor, your signal to noise ratio will be off. That is, you might possibly get a lot of notifications for things like old component, or components that are now unpopular.
That’s not to discourage you from monitoring these policies, they are important too. However, monitoring, and in turn, the notifications that are associated with monitoring are best reserved for policies that deal with elements like security vulnerabilities and license issues - that is, those representing a high level of risk.
While you can choose any application to monitor, most people start by monitoring an application in production.
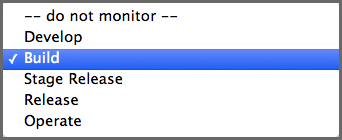
Great, now you can move on to picking the stage you want to monitor.
In general, if you are going to be monitoring a production application, you will want to choose the stage that represents the most recent data. For our example, we’ll choose Build, but again, you can choose any stage.
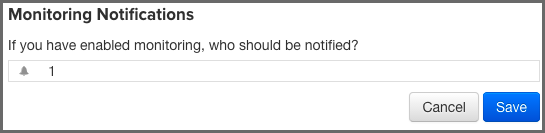
You are almost there, now all you need to do is add notifications.
Each policy you want to monitor will need to have someone added to the notifications. These are set below the Actions section of each policy.
|
|
|
|
Remember, you can only edit a policy based on your permissions and where it was created, if you don’t see the edit button for a policy, you either need to adjust your permissions, or switch to the organization the policy was inherited from. |
Congratulations! Your application now has a policy that will be monitored. To monitor more applications and/or policies, simply repeat the steps above.
|
|
|
|
While it is possible to follow these same steps and set policy monitoring at the organization, or even Root Organization level, you may want to think through that a bit more before blanketing all applications within a particular organization with policy monitoring notifications. In many cases, we find that monitoring is best done on a few, high risk, production applications. |
Configuring Notification Times. By default any new notifications for policies that are being monitored will be sent out at 12 AM (per the IQ Server time). If you would like to update this, simply edit your config.yml file for the IQ Server. The lines you will need to look for are as follows:
# Hour of the day(0-23) to schedule Policy Monitoring execution. The
default is midnight.

#policyMonitoringHour: 0
If you recall from the Hierarchy and Inheritance section in the previous chapter, there are three core levels (these match the levels where policy can be created as well):
In the case of the Root Organization, policies created at this level (with the exception of policies applied to specific Section 8.3, “Tags”) will be inherited by anything below it (i.e. organizations, applications, and repositories). In the same way any policy created in an organization will be inherited by any attached applications.
As you create policy, consider the various scenarios where the policy can be applied (e.g. repositories and applications). While it’s often a thought to create individual policy in each application, this will inhibit your ability to make wider changes, and should be reserved for those scenarios where very specific policy is needed.
If you do go this route, that is creating application level policies, consider that additional micromanagement is required. In many cases, this increases the opportunity for error. So, keeping them at a minimum, and only for those unique scenarios is ideal.