If you look at policy violations as a pain point preempting the flow of work, you are likely going about your evaluations and policy in the wrong way. In fact, if you saw the title of this section, hoping to find a way past policy violations, there may be a couple issues.
First, your policies should be designed to encourage workflow and communication. If development is being stopped regularly, you might want to revisit your policies, refining them so they present the possibilities for making better choices, not simply halting work altogether.
Second, and perhaps most importantly, there are not false positives when it comes to policy violations. If you are looking for ways just to get past a violation, you’ve circumvented the goal of policy creation. Why not simply not make it a policy? Better yet, this might be a problem with policy, or the perception of what should and should not be in your application.
So, excluding those possibilities, and working with the idea that you are here to find a way to accommodate the exceptions you may run across, waivers can help.
Let’s say, you have a component that’s violating a policy, which has been created in an organization that houses your application. It’s a great policy, in fact, one of many great policies. Unfortunately, one of your applications has a component that is violating a policy.
The problem is, that this policy just doesn’t accurately line up to the implementation of this particular application. Your application has a security vulnerability that can be exploited when it connects to the internet. It’s a pretty severe vulnerability, but benign given that your application is internal, and doesn’t even have the ability to connect to the Internet.
What should you do?
You could…
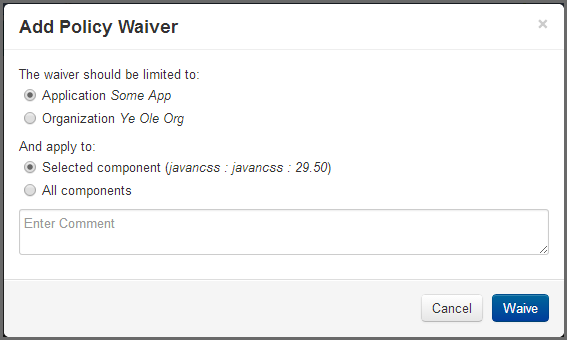
That is, by adding a waiver, you indicate that this particular component, either in the scope of this application (what we would do in our example), or all applications for the organization, is waived from this particular policy. In fact, if you desired you could even specify that you want to waive all components (within scope of an application or organization) from a policy.
Now the important thing to take note of here, is that while this waiver seems to be the answer to policy violations strife, you are actually waiving an entire policy. This means all constraints, and in turn, all conditions. It’s no surprise why that should be something that’s limited. For this reason, before waiving something, it’s good practice to review some alternatives. A waiver very much does allow you to simply bypass all controls.
OK, we’ve harped enough on the warnings. The benefits of waivers can be just as numerous. This is because even with endless customizations, you will encounter situations where a policy just doesn’t apply. It’s important to take a look at the full range of waiver functionality, so let’s look at how to add, view, and when necessary, remove a waiver.
There are several options at this point, and each should be carefully considered:
|
|
|
|
When processing a waiver, depending on the options that are chosen, you can effectively waive a policy for all components, for all applications in an organization. Since this will waive the entire policy, not just this violation, it may be a good idea to ensure adjusting the policy would not provide a solution that is more visible to all users. |
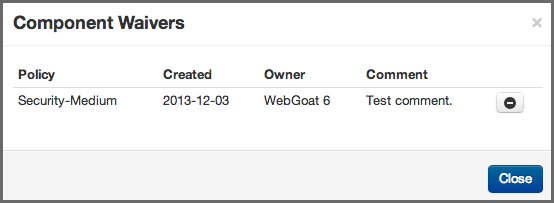
As we mentioned previously, component violations can be waived for a single component in a single application, all the way up to all components in all applications. This means, that a violation for a component in your application could have been waived elsewhere. A good practice when reviewing the Application Composition Report is to check and see what violations have been waived for components in your application. Here are a couple examples of why this is important:
To view waived violations for your components, follow the instruction below.
Navigate to the Policy tab on the report. Just above the list of components, and to the right of the report, you will see three options in the Violations filter:
|
|
|
|
Because some waivers can be set for all applications, and even all components, it’s important to understand the impact of removing a waiver. Be sure to verify with the application or organization owner, the intended scope of the waiver. |