The first step to enabling the features associated with Sonatype CLM is connecting to an existing Sonatype CLM Server. The Sonatype CLM Server is a separate server application that Nexus integrates with via API calls.
If this is your first time working with Sonatype CLM, and you haven’t already installed and configured your Sonatype CLM Server, you will want to do that before moving forward. Instruction can be found in the <<chapter-server-setup, Nexus IQ Server Setup chapter>.
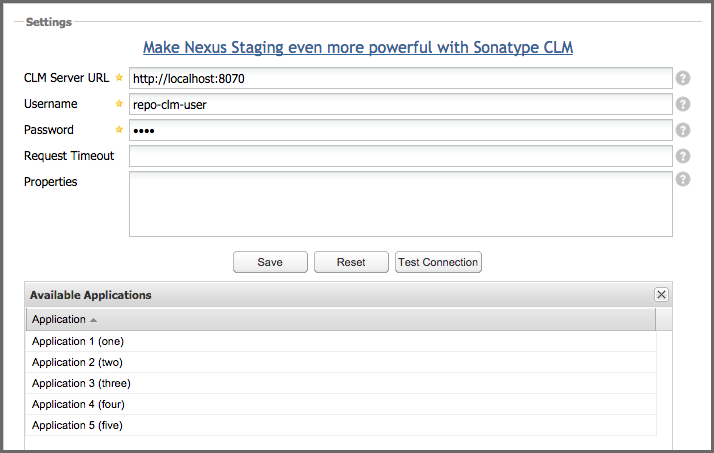
Once your Sonatype CLM Server is installed and configured, you are ready to connect Nexus to the CLM Server. From within Nexus Professional, click on the CLM menu item in Administration section on the left of the Nexus application window. This will open the tab visible in Figure 12.1, “CLM configuration tab in Nexus”.
To configure the connection to the Sonatype CLM Server, follow these instructions:
Enter the Username and Password.
|
|
|
|
We recommend that you create a unique machine account that has access to the application(s) you wish to link to your Nexus repositories. . (Optional) Enter a Request Timeout. . (Optional) Enter information in the Properties input field using a key=value definition per line. An example is |
procArch=false
ipAddresses=true
operatingSystem=false
These properties are passed to the CLM Server and can, for example, determine what properties are logged as part of a validation. Consult the CLM Server documentation for suitable parameters. In most use cases you will not need to configure any properties.
If successfully connected, a list of available applications will be displayed as seen in Figure 12.2, “CLM configuration tab after Test Connection”. For more information of setting up organizations, applications, and policies, please review the chapter on Policy Management.
Alternatively you can enable, disable, and/or configure the Sonatype CLM integration by adding the CLM: Configuration capability like any other capability as documented in the Accessing and Configuring Capabilities section of the Nexus book.
|
|
|
|
The features described here require licenses for Nexus Professional as well as Sonatype CLM Server that activate them. You can obtain them from our support team and will have to install them prior to the configuration. |
With the connection between the CLM Server and Nexus established, you can configure any organizations, applications, and policies in the CLM server. Because Nexus will be accessing the CLM server using an application identifier (App ID), you will need to configure one application for each different application use case in Nexus.