
Sonatype CLM Server - Policy Management Guide
The first step in using the stand-alone scanner to evaluate an application, is
to download the jar file named similar to sonatype-clm-scanner-1.7.0-02.jar
from the
Sonatype
Support website and place the file in its own directory.
Prior to your scan, you will need to make sure you have everything setup for your application. At a minimum, you must have:
- Created an organization
- Created an application
- Imported or created a policy
In order to evaluate an application, you must have the application id. This can be found by:
- Log into your Sonatype CLM server with a user account that has proper permissions to view a report for a specific application (at least a member of the developer group for the application would be required).
-
Next, click the Organizational Design icon
 to
access the Organizational Design area.
to
access the Organizational Design area.
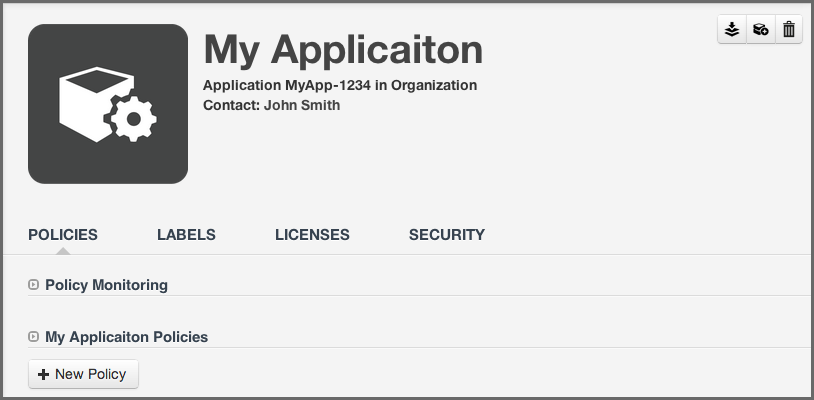
- Once there, click Applications (located in the menu on the left side of the screen), and then choose an application. You should see a screen similar to Figure 8.2, “Application Overview with Application Identifier”.
- Locate the text underneath the application name. The application identifier is the text between Application and in [organization name]. In the example below it is MyApp-1234.
Now that you have the stand-alone scanner setup, you are ready to evaluate an
application. As a Java application, it can be started using the java command
for the scanner jar, and adding the necessary parameters. The syntax below
represents the minimum set of options required to evaluate an application:
java -jar [scanner jar] -i [application id] -s [server URL] [target]
-
scanner jar -
This is the path to Sonatype CLM Scanner (Stand-alone scanner) jar file
e.g.
./sonatype-clm-scanner.jar. -
--application-id -
Using the switch
-i, enter the application id for your application (see instructions above). -
--server-url -
Using the switch
-senter the location of your CLM server (e.g.http://localhost:8070). -
Target -
This is the path to a specific application archive file or a directory
containing such archives. A number of formats are supported, including
jar,war,ear,tar,tar.gz,zipand many others.
Tip
Listed in the options below, you can specify the specific CLM stage. However, if you do not include this option the system will default to the Build stage.
There are several additional options that can be used in the construction of the syntax for evaluating an application with the stand-alone scanner.
-
--fail-on-policy-warnings -
using the switch
-wwill cause a failure of the evaluation if any warnings are encountered. By default, this is set to false. -
--ignore-system-errors -
Using the switch
-e, allows you to ignore any system errors (e.g. IO, Network, server, etc.). This is most helpful when using the stand-alone scanner with continuous integration servers, as these errors can cause the unintentional failure of a build. -
--proxy -
Using the switch
-p, you can specify a proxy to use in connecting to the CLM Server. The format is <host[:port]>. -
--proxy-user -
Using the switch
-U, you can specify credentials for the proxy. The format is <username:password>. -
--result-file -
Using the switch
-r, you can specify the name and location of a JSON file that will store the results of the policy evaluation in a machine-readable format. -
--stage -
Using the switch
-t, you can specify the Sonatype CLM stage you wish the report to be associated with. This is an optional parameter, and if it is not specified, the report will be associated with the Build stage by default.
Note
At this time only the Build, Stage Release, and Release stages will display a report in the CLM Reports Dashboard. For a full list of stages, use the CLI help provided with the plugin.
In an example scenario, let’s say you have copied the sonatype-clm-scanner.jar
as well as the application you want to examine to a specific directory e.g.
~/clm-test. The application’s filename is sample-application.zip.
To scan this application you have to identify the Sonatype CLM Application ID
and supply it with the -i switch as well as supply the URL of your CLM server
with -s. As an option, and what is demonstrated below, you can also specify a
particular stage.
The full command line for an Application ID Test123 and a URL of
http://localhost:8070 is
java -jar ./sonatype-clm-scanner.jar -i Test123 -s http://localhost:8070
-t release sample-application.zip
To access help content for the scanner run the scanner without supplying parameters:
java -jar ./sonatype-clm-scanner.jar
Go ahead and try a scan yourself. The Sonatype CLM stand-alone scanner will accept a number of file types, including jar, war, and zip files. If your scan is successful, the log output of the command execution will provide a summary as well as a link to the produced results similar to:
[INFO] Policy Action: Warning
[INFO] Summary of policy violations: 4 critical, 85 severe, 46 moderate
[INFO] The detailed report can be viewed online
at http://localhost:8070/ui/links/application/my-app/report/95c4c14e