
Optimized Component Lifecycle Management with Sonatype CLM
Sonatype CLM not only limits access by login, but it also distinguishes the level of access, what a user can or can’t do, using an intuitive system of roles. Each role has a specific set of permissions. Users are then assigned to these roles, granting users the ability to perform various functions or limiting access to points of data within Sonatype CLM.
Needless to say, the roles and permissions management system inside of Sonatype CLM is powerful. Unfortunately, powerful can sometimes translate to overwhelming. To help ease you into managing Sonatype CLM permissions, this section of the Security Administration Guide will walk you through everything you need to know. This includes:
- Organizations and Applications
- Roles and Permissions
- Assigning Users to Roles
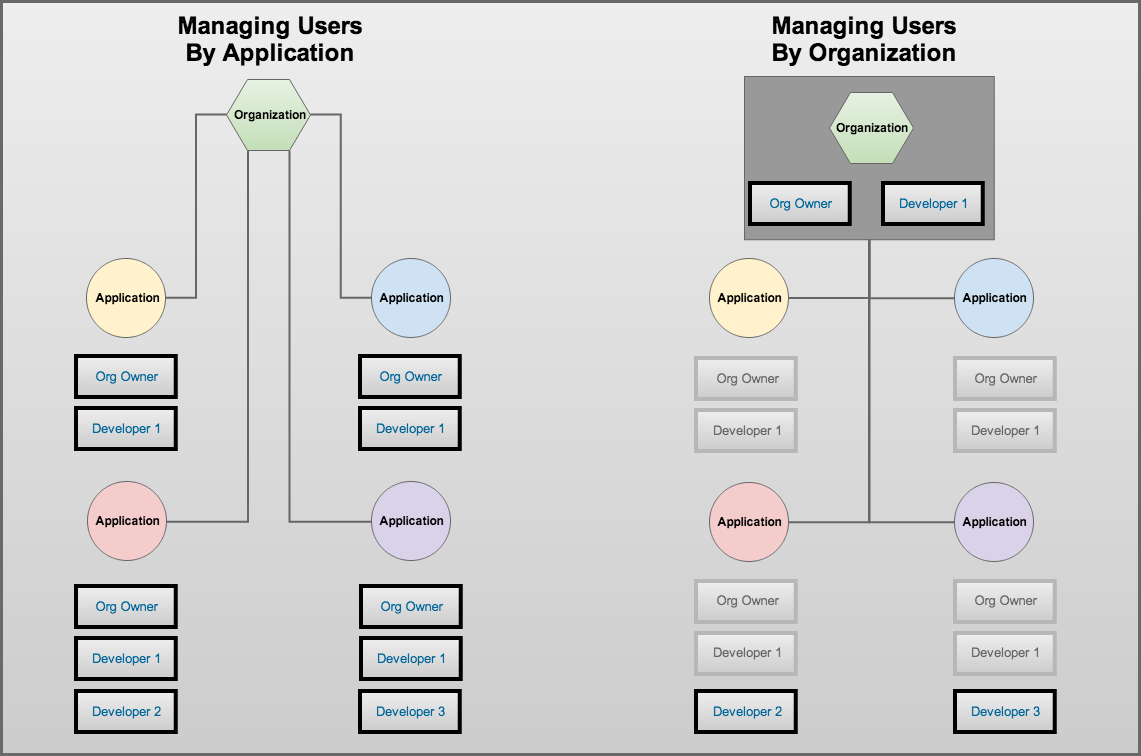
Whether or not you will ever interact with elements of Sonatype CLM outside of Security Administration, you will still need to understand the impact Organizations and Applications have on how roles are managed. Mainly granting at the application level is exclusive to that application, while granting at the organization level allows access to view and make changes across any assigned applications as well as the organization itself. This is due to a concept called inheritance, and it can be used to vastly reduce the need to add every user to each application.
While, we do cover this in our other guides, we should start by taking a basic look at these two areas. The image below gives an example of how we can reduce repetition of users by choosing to manage by organization.
- Applications
-
Applications are created in Sonatype CLM. They allow users to identify a specific project, and then track the health of components in that project. Each application must have a specific name, a unique identifier (Application ID), and an organization. Each application may also have policies (rules) and other associated policy elements (e.g. license threat groups and labels). Finally, an application will inherit policies and policy elements from its selected organization.
The important piece to see here is that applications are very singular. Changes made here will have an impact, but will be isolated to the particular application. This is very different compared to organizations.
- Organizations
-
Similar to applications, an organization will have a specific name, but it does not need a specified identifier. Organizations may also have policies (rules) and a number of associated policy elements (e.g. license threat groups and labels). However, unlike applications, organizations aren’t tied to a specific project / application. Instead, they function more like a container to hold multiple applications. Given this, in cases where an organization has policies or policy elements, any application that has selected this organization, will inherit all those policies and policy elements.
Again, the important piece to pay attention to here is that users assigned to an organization have the potential to view and/or interact with not just the organization, but also any application attached to that organization.
If you skipped to here, we understand, you are in a hurry to get Sonatype CLM working in your business. However, in bypassing our basic organization and application overview, we will assume you are familiar with those concepts. If you haven’t, go take a look again. Even if you don’t plan on using CLM beyond a role of installation, deployment, and/or security administration, the previous section can help prevent unwanted access and reduce unnecessary repetition.
If you are still dissuaded, here is the abbreviated version:
- Adding a user to a role for an application grants access to only that application.
- Adding a user to a role for an organization grants access to the organization AND all attached applications due to a principle called inheritance.
OK, so we know to be careful when adding a user to a role for an organization or application, but what is a role exactly?
Great question, a role is a set of permissions that have been predefined by Sonatype. These permissions are based on the concept of being able to either view data or manipulate. And by manipulate, we mean the ability to create, edit or delete. In Sonatype CLM, two standard roles are included:
- Owner - allows a user to view, create, edit and delete.
- Developer - allows only the ability to view.
In both cases, the second most important aspect of roles is where the role is assigned, either at the organization, or the application. To understand this a little better, let’s look at a few examples.
- Using the Developer Role
- First, I have a member of the development team for my application, Awesome App. I only want this team member to be able to view aspects of Awesome App, such as the report displaying policy violations, or see the policy itself. This team member shouldn’t be able to edit, and again I only want them to see information for Awesome App. In this example, I would assign my user to the developer role for Awesome App.
- Using the Owner Role
- Alright, now lets look at a slightly different example. A member of your security team, responsible for ensuring components in applications meet your business’s specific standards, needs access to review policy and violation results for all applications. He/She is also responsible for managing policies, meaning he/she will need to make changes. However, they are only responsible for Awesome App, so the access this individual needs is Owner access, and like before, this would be at the application level. Specifically, I would make them an owner for Awesome App.
- Inheriting a Role
-
Well, it seems easy enough to assign a role to an individual, but what happens if you need to add someone to all the applications under an organization, say like the Director of Development? OK, one more example then.
The Director of Development, who is also responsible for managing policies and setting up new applications, needs access to Sonatype CLM. The director will need to have full access to create, view, edit and delete multiple application. Now, we could go in and make the Director an owner of each application. However, just like policies and policy elements (what we discussed previously), applications also inherit role members based on their organization. So, all we need to do for our direction, is assign them as an owner for a specific organization, or perhaps even multiple organizations, if you have set CLM up that way.
Tip
You can use inheritance when assigning developers as well. Just like the example above, if you want a user to be in the Developer Role for all applications in an organization, simply add the individual to the Developer Role at the organization level.
Obviously, there are lots of examples we could run through. However, just remember that the level of the Role you are assigning a user to is as important as the role itself. Now that you know, let’s go assign some users to roles.
Note
We specifically left out one role, Administrator, which is identical to the default admin account that ships with Sonatype CLM. It is considered a Global Role, and if you are looking to grant a user access to full rights in Sonatype CLM, this is the role you would use. It is important to note, that limited use of this role is suggested, and modification must be made by an existing member of the Administrator role.
The process for assigning a user to a standard role is identical whether you are doing it at the organization or application level. While there are differences applied to the scope of access the role will have, these have been outlined in the sections above, and won’t be discussed here. It’s also important to point out that if you have configured LDAP Users or LDAP Groups, those will be returned when searching for users. With all of that out of the way, let’s assign a user to a role.
- First, log into the Sonatype CLM Server (by default this is available at http://localhost:8070) using a user account with Admin-level permissions (a member of the Admin Group).
-
Next, make sure you are in the Organizational Design area. If not,
click the Organizational Design icon
 .
.
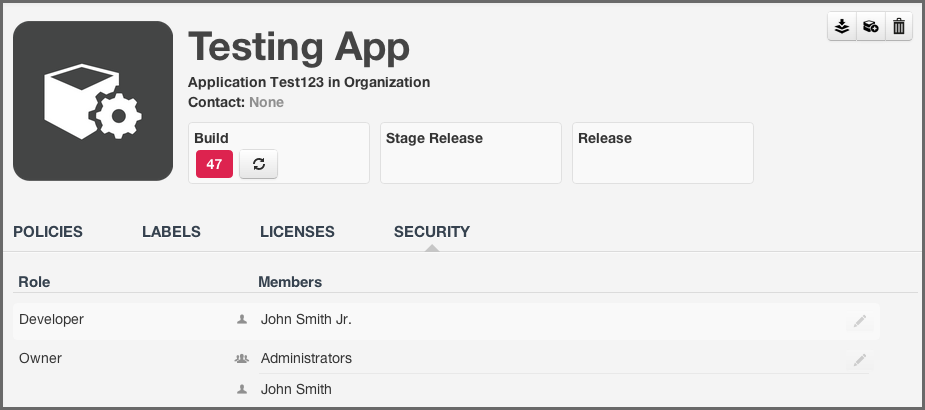
- Once in the Organizational Design area, click on a specific organization or application, and then click the Security tab.
- A list of roles will be displayed, as well as the members of that role.
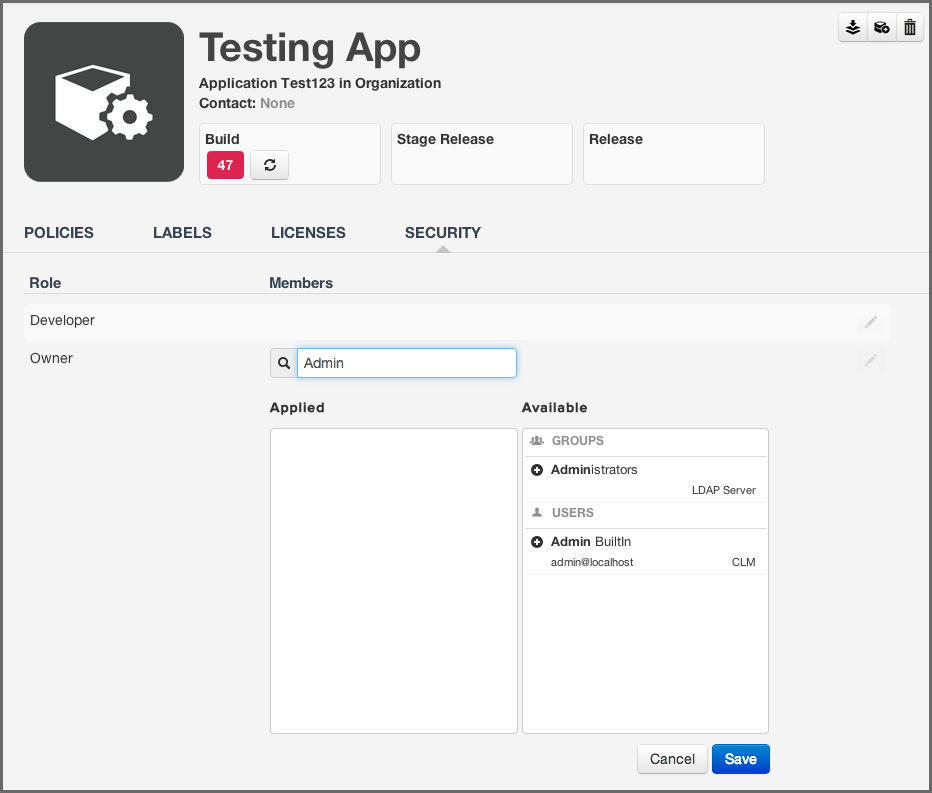
- To edit this list, hover over the role you wish to add a user to, and then click the Edit icon.
- To find a user, begin typing the user’s name in the search field. No matter what you type, Sonatype CLM will find the best match, bolding the matched text in both the applied and available columns.
- Once you see the user you wish to add in the Available column, click the Plus icon to move them to the Applied column.
- Click the Save button to save your changes.
Tip
You may notice that below each user, there is additional information. Most often this is the email. However, to the right of the email you will see the Realm (e.g. CLM). Use this to ensure you add the appropriate account (e.g. when working with CLM the local realm, and LDAP).
Note
To remove users from a role, follow the same process above, just click the Minus icon to move the user from the Applied column to the Available column. However, if the user has been inherited, these must be removed at the organization level, and can be identified by no Minus icon.
As we mentioned previously, there is another role type, the Global Role. Global roles operate independently from standard roles, and at this time only includes Administrators. Any member of the Administrator Role will have access to every aspect of Sonatype CLM, including the ability to create new organizations and delete existing ones. Additionally, this administration role has the ability to assign users to any other role on Sonatype CLM.
Adding a user to the Administrator role is similar to standard roles, however it is managed in the Security section of CLM System Preferences. Also, just as with Standard Roles, if you have configured LDAP Users or LDAP Groups, those will be returned when searching for users. To add a user to this role:
- First, log into the Sonatype CLM Server (by default this is available at http://localhost:8070) using a user account with Admin-level permissions (a member of the Admin Group).
-
Click the system preferences icon
 located in the top right of the CLM Header/Screen (resembles a cog/gear).
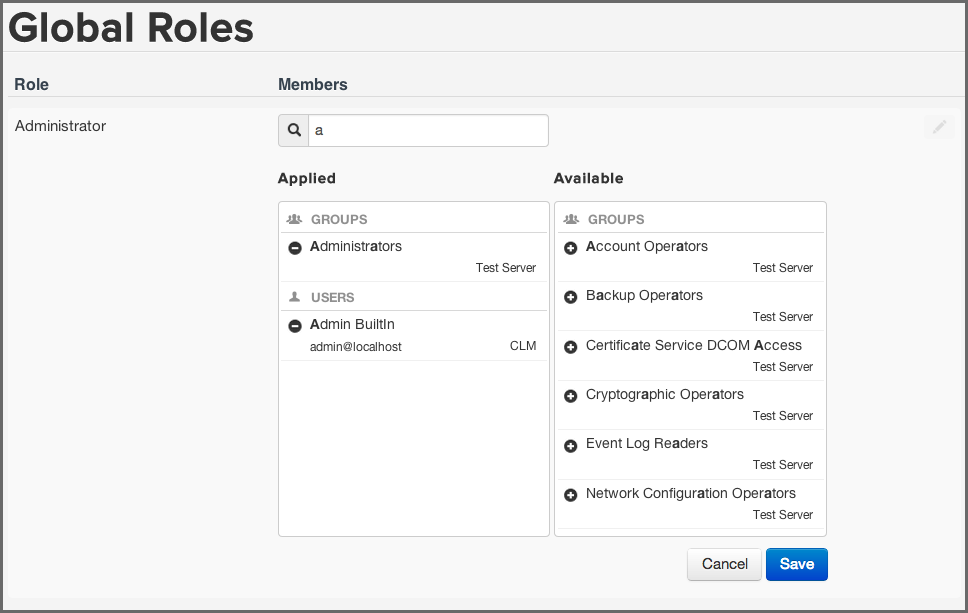
- Choose Global Roles from the drop down menu. The Global Roles System Preferences area, and a list of roles will be displayed.
- Next to the role name a list of users that are assigned to will be displayed. To edit this list, hover over the role you wish to add a user to, and then click the Edit icon.
- To find a user, begin typing the user’s name in the search field. No matter what you type, Sonatype CLM will find the best match, bolding the matched text in both the applied and available columns. As mentioned above, if configured, LDAP Users and Groups will also be displayed here.
- In some cases, you may be using multiple realms beyond that of Sonatype CLM, for example, LDAP for Active Directory. In these cases the Realm information will also be displayed.
- Once you see the user you wish to add in the Available column, click the Plus icon to move them to the Applied column.
- Click the Save button to save your changes.
Tip
You may notice that below each user, there is additional information. Most often this is the email. However, to the right of the email you will see the Realm (e.g. CLM). Use this to ensure you add the appropriate account (e.g. when working with CLM the local realm, and LDAP).
Note
To remove users from a role, follow the same process above, just click the Minus icon to move the user from the Applied column to the Available column.