
Optimized Component Lifecycle Management with Sonatype CLM
In order to scan and evaluate an application, you need to have created at least one organization and one application, as well as created or imported at least one policy at either the organization or application level. You will also need to make sure you have the proper permissions to view report information for the application you wish to scan.
While scanning can be initiated from various enforcement points (e.g. Sonatype CLM for CI, IDE, and Nexus Pro), the quickest way to get started is to perform a scan manually. This can be done using the stand-alone scanner, or via the CLM server.
In both cases, the end result is the generation of reports associated with the Sonatype CLM stage chosen during this manual evaluation process. However, the implementation is slightly different for each of these options. That is, the CLM server provides a graphical user interface (GUI) to easily upload and scan an application, while the stand-alone scanner provides similar options but utilizes the command line interface (CLI).
We’ll cover both of these options below, starting with the CLM Server.
Tip
It’s important to remember, that both scanners provide the same report produced via the other enforcement point tools like Sonatype CLM for CI or IDE or Nexus Pro.
As mentioned previously, before you can scan and evaluate an application, you will need to make sure you have:
- Created an organization
- Created an application
- Imported or created a policy
With the above complete, you are ready to scan and evaluate an application via the CLM Server.
- First, login to the CLM Server. You will need to at least be an application owner for the application you want to scan and evaluate.
-
Next, click the Organizational Design icon
 to access the
Organizational Design area. Once there, click Applications (located in the
menu on the left side of the screen), and then choose an application.
to access the
Organizational Design area. Once there, click Applications (located in the
menu on the left side of the screen), and then choose an application.
-
In the top right of the Application Management area, click the Evaluate an
Application icon
 .
.
-
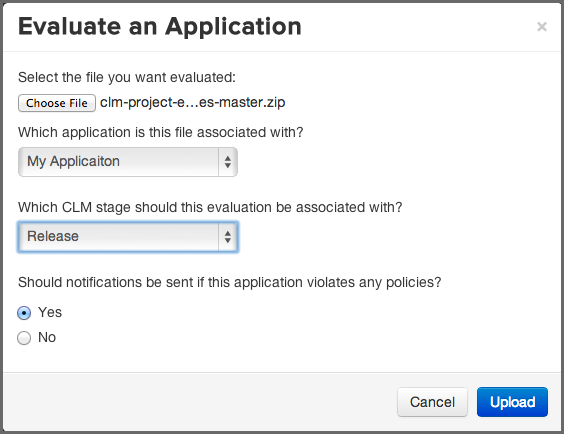
A modal will display providing a number of required fields.
- First, choose the bundle (application) you want scanned. Clicking Choose File will allow you to browse your directories for the application you wish to scan.
- Next, choose the application in Sonatype CLM you want to associate with the scan. By default, this will be pre-populated with the name of the application you first selected.
- After choosing the application to scan, you will need to specify the stage, this will affect where the report is displayed, and will overwrite the most recent report for the application and stage selected.
- Finally, if you have configured notification for your policy, or policies, you can choose whether or not you want those notifications sent.
- Click the Upload button to begin evaluating the chosen application.
- The Evaluation Status will display, showing you the progress of your scan. When complete, you can click the View Report button to view the results of your scan.
Note
You can also evaluate an application via the Organizations area, simply click on Organization instead of Applications and follow the instructions from there. You will still need to have created an application, and the application won’t be pre-filled for you in the form.
The first step in using the stand-alone scanner to evaluate an application, is
to download the jar file named similar to sonatype-clm-scanner-1.7.0-02.jar
from the
Sonatype
Support website and place the file in its own directory.
Prior to your scan, you will need to make sure you have everything setup for your application. At a minimum, you must have:
- Created an organization
- Created an application
- Imported or created a policy
In order to evaluate an application, you must have the application id. This can be found by:
- Log into your Sonatype CLM server with a user account that has proper permissions to view a report for a specific application (at least a member of the developer group for the application would be required).
-
Next, click the Organizational Design icon
to
access the Organizational Design area.
- Once there, click Applications (located in the menu on the left side of the screen), and then choose an application. You should see a screen similar to Figure 3.13, “Application Overview with Application Identifier”.
- Locate the text underneath the application name. The application identifier is the text between Application and in [organization name]. In the example below it is MyApp-1234.

Now that you have the stand-alone scanner setup, you are ready to evaluate an
application. As a Java application, it can be started using the java command
for the scanner jar, and adding the necessary parameters. The syntax below
represents the minimum set of options required to evaluate an application:
java -jar [scanner jar] -i [application id] -s [server URL] [target]
-
scanner jar -
This is the path to Sonatype CLM Scanner (Stand-alone scanner) jar file
e.g.
./sonatype-clm-scanner.jar. -
--application-id -
Using the switch
-i, enter the application id for your application (see instructions above). -
--server-url -
Using the switch
-senter the location of your CLM server (e.g.http://localhost:8070). -
Target -
This is the path to a specific application archive file or a directory
containing such archives. A number of formats are supported, including
jar,war,ear,tar,tar.gz,zipand many others.
Tip
Listed in the options below, you can specify the specific CLM stage. However, if you do not include this option the system will default to the Build stage.
There are several additional options that can be used in the construction of the syntax for evaluating an application with the stand-alone scanner.
-
--fail-on-policy-warnings -
using the switch
-wwill cause a failure of the evaluation if any warnings are encountered. By default, this is set to false. -
--ignore-system-errors -
Using the switch
-e, allows you to ignore any system errors (e.g. IO, Network, server, etc.). This is most helpful when using the stand-alone scanner with continuous integration servers, as these errors can cause the unintentional failure of a build. -
--proxy -
Using the switch
-p, you can specify a proxy to use in connecting to the CLM Server. The format is <host[:port]>. -
--proxy-user -
Using the switch
-U, you can specify credentials for the proxy. The format is <username:password>. -
--result-file -
Using the switch
-r, you can specify the name and location of a JSON file that will store the results of the policy evaluation in a machine-readable format. -
--stage -
Using the switch
-t, you can specify the Sonatype CLM stage you wish the report to be associated with. This is an optional parameter, and if it is not specified, the report will be associated with the Build stage by default.
Note
At this time only the Build, Stage Release, and Release stages will display a report in the CLM Reports Dashboard. For a full list of stages, use the CLI help provided with the plugin.
In an example scenario, let’s say you have copied the sonatype-clm-scanner.jar
as well as the application you want to examine to a specific directory e.g.
~/clm-test. The application’s filename is sample-application.zip.
To scan this application you have to identify the Sonatype CLM Application ID
and supply it with the -i switch as well as supply the URL of your CLM server
with -s. As an option, and what is demonstrated below, you can also specify a
particular stage.
The full command line for an Application ID Test123 and a URL of
http://localhost:8070 is
java -jar ./sonatype-clm-scanner.jar -i Test123 -s http://localhost:8070
-t release sample-application.zip
To access help content for the scanner run the scanner without supplying parameters:
java -jar ./sonatype-clm-scanner.jar
Go ahead and try a scan yourself. The Sonatype CLM stand-alone scanner will accept a number of file types, including jar, war, and zip files. If your scan is successful, the log output of the command execution will provide a summary as well as a link to the produced results similar to:
[INFO] Policy Action: Warning
[INFO] Summary of policy violations: 4 critical, 85 severe, 46 moderate
[INFO] The detailed report can be viewed online
at http://localhost:8070/ui/links/application/my-app/report/95c4c14e
Whether you’ve scanned via the GUI interface, or using the stand-alone scanner, a successful scan will result in a link to the report being displayed in both the Application Management area for each application, as well as Reporting area of the Sonatype CLM Server.
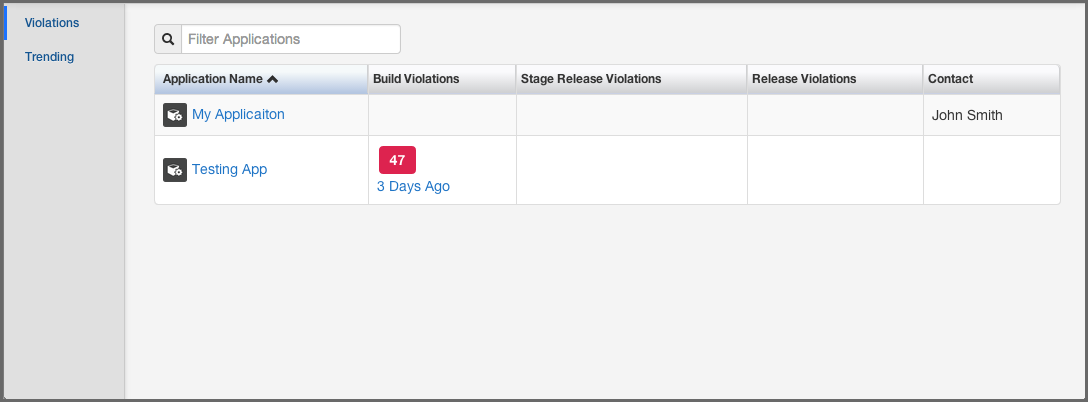
Note
If using the stand-alone scanner, and you kept our defaults, the report will be listed under Build Violations. You should see something similar to the results displayed in Figure 3.14, “Violations Report after Scan”.
How did scanning an application go? Pretty simple right?
In this section there are couple of key pieces of functionality we introduced you to. This includes:
- Evaluating applications via the Sonatype CLM Server
- Evaluating applications via the stand-alone scanner
As we’ve mentioned before, evaluating an application is the essence of Sonatype CLM, and the tools available right inside the CLM Server, or even the stand-alone scanner, provide quick and effective ways to get results without needing to interact with other enforcement points.
That said, these tools work best when you are only looking to scan a few applications. If you have hundreds, or maybe even thousands, of applications to evaluate, you are going to want to look into integrating an enforcement point (e.g. Sonatype CLM for CI).