Optimized Component Lifecycle Management with Sonatype CLM
Eclipse Hudson and Jenkins are powerful and widely used open source continuous integration servers providing development teams with a reliable way to monitor changes in source control and trigger a variety of builds. They excel at integrating with almost every tool you can think of.
Historically the Hudson project and community split into two groups, with Jenkins as well as Hudson emerging as sibling products with a different focus going forward while sharing a common API for plugins. In general, with regard to the Sonatype CLM for CI functionality, the interaction will be near identical, with only a few differences, which are inherent to the CI, and not Sonatype CLM.
The Sonatype CLM for CI plugin scans the project workspace after a build for all supported component types, creates a summary file about all the components found and submits that to the Sonatype CLM service. The service uses that data to produce the analysis with the security and license information and send it back to the CI server. It will then use these results to render the analysis reports.
The file types supported for analysis are in tar/zip like format with the extensions tar, tar.bz2, tb2, tbz, tar.gz, tgz and zip or in Java archive formats of the type jar, ear, war, hpi, wsr, har, sar, rar, mar and nbm.
The Sonatype CLM for CI plugin is distributed as a Hudson plugin
package (.hpi file) and is compatible with Jenkins and Hudson.
In order to install the plugin you have to log into Jenkins or Hudson as administrator and then select to Manage Jenkins/Manage Hudson to get to the global configuration menu displayed in Figure 5.1, “Jenkins Global Configuration Menu” in the Jenkins look. The Hudson look will be similar in content, yet different in colors and styling.
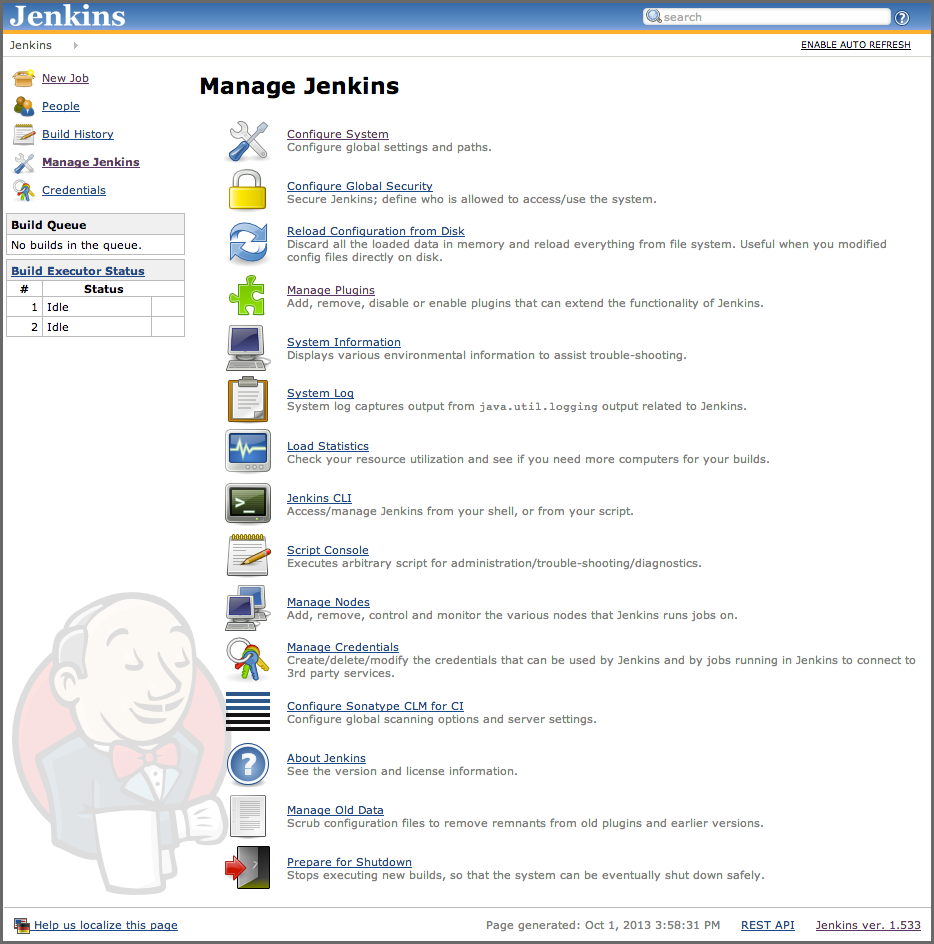
From the displayed configuration menu, select Manage Plugins and in the plugin management section, choose the Advanced tab.
The advanced plugin management allows you to upload a plugin
distribution file (.hpi) in the section entitled Manual Plugin
Installation on Hudson and Upload Plugin on Jenkins. Click on
Choose File and select the Sonatype CLM for CI plugin hpi file named
sonatype-clm-ci-x.y.z.hpi with x.y.z representing a version number
like 2.11.2 in the file selection dialog. Then press the Upload
button. Once the plugin has been uploaded to the server, you need to
restart your continuous integration server.
After a successful installation of the Sonatype CLM for CI plugin, the global Jenkins/Hudson configuration menu, displayed in Figure 5.1, “Jenkins Global Configuration Menu” includes a separate item for Sonatype CLM with the title Configure Sonatype CLM for CI . Click the link to get to the global configuration displayed in Figure 5.2, “Global Configuration of Sonatype CLM for CI in Jenkins”.
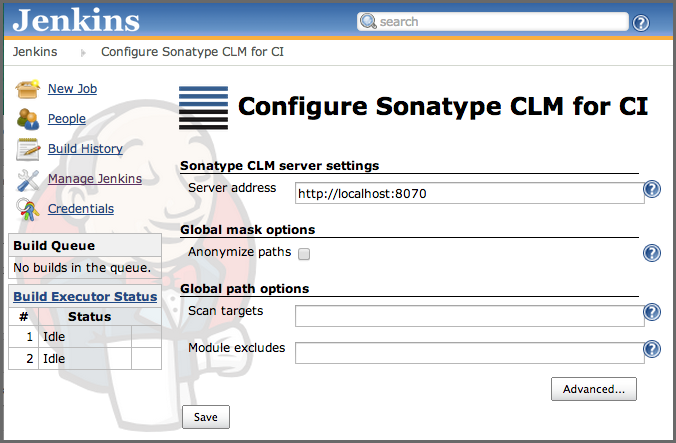
The global configuration for Sonatype CLM for CI is used as the default configuration for all invocations of the plugin. Specific parameters supplied for individual jobs are appended to the global configuration. You can configure the following settings:
- Sonatype CLM server settings
-
- Server address
-
The address for the Sonatype CLM server as it can be
reached from the Jenkins/Hudson server. The address should be the same
one a user is using to access the Sonatype CLM server interface. A
suitable URL for a default install on your local computer would be
http://localhost:8070. If your Sonatype CLM server is behind a proxy server for serving HTTPS or other reasons, you have to use the public URL as it is reachable from the continuous integration server. Only the master Jenkins/Hudson server connects to the CLM server and you therefore only need ensure connectivity in terms of open firewall ports and proxy server settings between the master CI server and the CLM server. This configuration parameter is the only required setting.
- Global mask options
-
- Anonymize paths
- Enabling this feature will anonymize all paths before data is sent to the Sonatype CLM server. Ultimately, this prevents the CLM report from reporting the locations/occurrences of components. Our recommendation is to leave this disabled, unless you are worried about Sonatype knowing about the file names of your components.
- Global path options
-
- Scan targets
-
The scan targets setting allows you to control which files should be examined. The configuration uses an Apache Ant styled pattern, is relative to each project’s workspace root directory, and has a useful default setting that includes all
jar,war,ear,zipandtar.gzfiles. The default value is therefore**/*.jar, **/*.war, **/*.ear, **/*.zip, **/*.tar.gz
Note
This default only applies if and only if neither global nor job config specify scan targets.
- Module excludes
-
As part of CLM, Sonatype has included a CLM Maven Plugin. Use of the CLM Maven plugin in the build process will result in the creation of module information files. If desired, you can exclude some of the modules from being scanned. The default location where the modules are stored is
${project.build.directory}/sonatype-clm/module.xml.To exclude a module, use a comma-separated list of Apache Ant styled patterns relative to the workspace root that denote the module information files (
**/sonatype-clm/module.xml) to be ignored, e.g.**/my-module/target/**, **/another-module/target/**
If unspecified all modules will contribute dependency information (if any) to the scan.
Tip
While the CLM Maven Plugin produces these files for all modules in a Maven build, the excludes can be used to ignore certain modules from analysis. For more on the CLM Maven Plugin, see Section 5.5.1, “CLM Maven Plugin Introduction”.
- Advanced options
- A number of additional parameters can be supplied to the plugin using this input field. Typically these parameters will be determined by Sonatype support.
After a completed installation (see Section 5.3.2, “Installation”) and global configuration (see Section 5.3.3, “Global Configuration”) of Sonatype CLM for CI, you are ready to configure an invocation as part of a specific job.
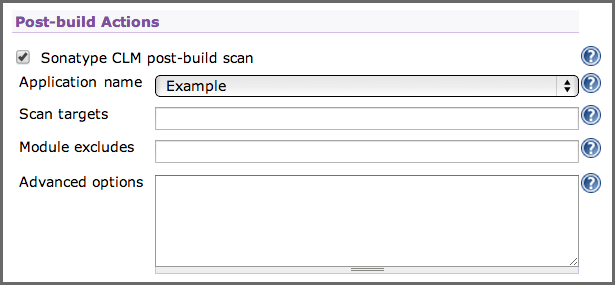
Depending on your job type it will be available as pre and/or post-build step as well as a invocation as a main build step. The typical invocation would be as main build step, after the package that should be examined has been created. An example configuration from Jenkins is displayed in Figure 5.3, “Sonatype CLM Build Scan Configuration for a Build Step”. Alternatively a post-build step for example as displayed in Figure 5.4, “Post-build Action Configuration as Example for a Sonatype CLM for CI Configuration” can be used as well. A pre-build step or a main build step executed before your main build invocation step could be used to examine components existing in the workspace or being placed into the workspace by an earlier build step.
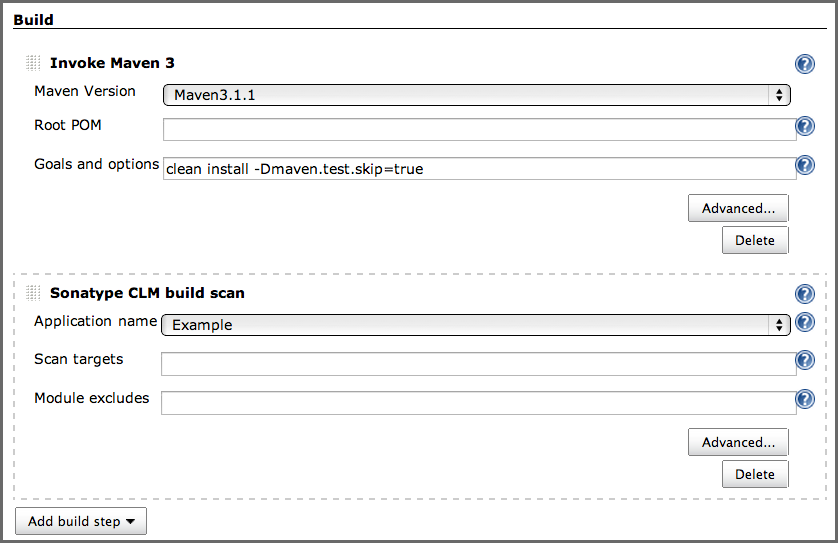
The configuration options for Sonatype CLM for CI invocations mimic the parameters from the global configuration described in Section 5.3.3, “Global Configuration” and are appended to the global parameters. The configuration parameters are:
- Application name
- The drop down for application name should be populated with the name of all applications configured in your Sonatype CLM server and allows you to select the desired application scanning configuration. The policies associated to the application will be used for the analysis of this build job output.
- Scan targets
- The scan targets setting allows you to control which files should be examined with an Apache Ant styled pattern. The pattern is relative to the project workspace root directory and inherits the global configuration.
- Module excludes
- You can exclude modules from being scanned with module information files configured in this setting. The default value is inherited from the global configuration.
- Advanced options
- A number of additional parameters can be supplied to the plugin using this input field. Typically these parameters will be recommended to you by the Sonatype support team.
Once a specific build has successfully completed, Sonatype CLM for CI provides a link to the application composition report in the job list in the Policy Violations column as well as the project specific overview page. Clicking on the link Application Composition Report, will direct you to the display of the report within the Sonatype CLM Server. The three boxes (red, orange, and yellow), below the link give you counts for policy violation counts for the different serverities as a quick indication of the analysis results.
In addition to the link to the report, the left hand menu for the job includes Application Management. Clicking on the link will take you directly to the specific application on the Sonatype CLM Server. In Figure 5.5, “Job Overview Page with Links to the Application Composition Report and Application Management” you can see both the link to the report, and the link to Application management.
Note
Accessing this information may require a login. Also, if you are using a version of the Sonatype CLM for CI plugin prior to version 2.11, and Sonatype CLM Server 1.7, a message will display indicating your report has been moved. Following this link will take you to the report on the Sonatype CLM Server.
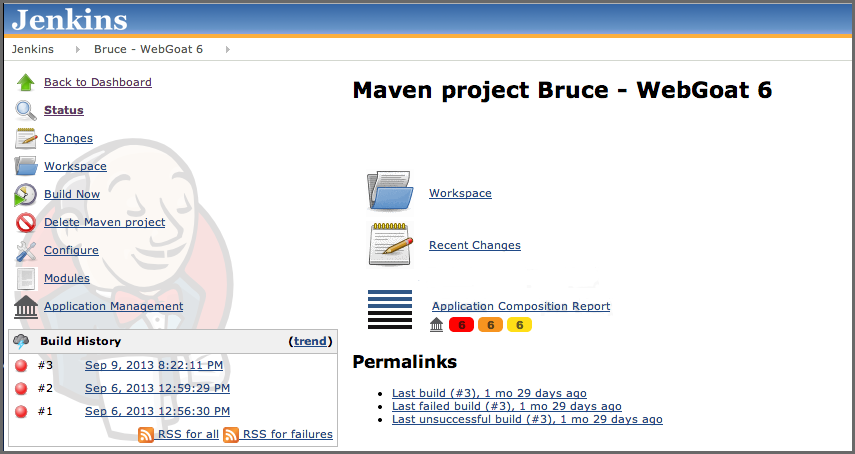
Figure 5.5. Job Overview Page with Links to the Application Composition Report and Application Management
If you are looking for previous report results, simply navigate to a specific build in the Build History. If you have previously scanned the application during that specific build, you will see a new item in the left menu, Application Composition Report. As with the report link above, you will be taken to the Sonatype CLM Server to review the results. An example is show in Figure 5.6, “Left Menu with Link to the Application Composition Report” below.