Nexus IQ for Jenkins 2.x evaluates a project workspace for all supported component types, creates a summary file about all the components found, and submits that to the IQ Server. The IQ Server uses that data to produce an analysis with security and license information and sends it back to the Jenkins server. These results are then used to render analysis reports.
|
|
|
|
Nexus IQ for Jenkins 2.x is only compatible with Jenkins versions 2.x and above. |
Install Nexus IQ for Jenkins 2.x using the following steps: . Login to Jenkins as an administrator. . Select Manage Jenkins from the left-navigation menu. . Select Manage Plugins from the list of configuration options. . In the Plugin Manager window, select the Available tab and enter nexus platform plugin in the Filter search box. . Select the Install checkbox next to Nexus Platform Plugin and then click the either the Install without restart or 'Download now and install after restart* button:
A message displays on the screen when Nexus IQ for Jenkins 2.x is successfully installed.
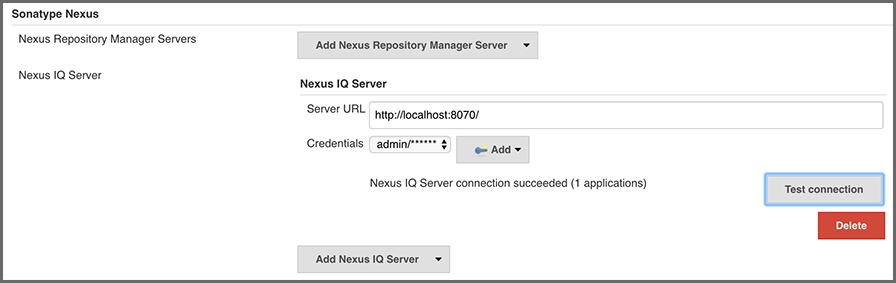
Use the following instructions to configure Jenkins to connect to your IQ Server:
In the Sonatype Nexus section, select Nexus IQ Server from the Add Nexus IQ Server dropdown menu and then enter the following:
Credentials: Select the Add button to enter your IQ Server username and password using the Jenkins Provider Credentials: Jenkins modal window. Once added, select your IQ Server username and password from the Credentials dropdown list and click the Test Connection button.
|
|
|
|
Only one IQ Server instance can be configured. |
After a completed installation and global configuration of Jenkins, you are ready to configure a build-step invocation as part of a specific job.
The freestyle build job is a flexible and configurable option, and can be used for any type of project. A multi-configuration build job should be used as a parameterized build job that automatically runs with all the possible acceptable combinations of parameters.
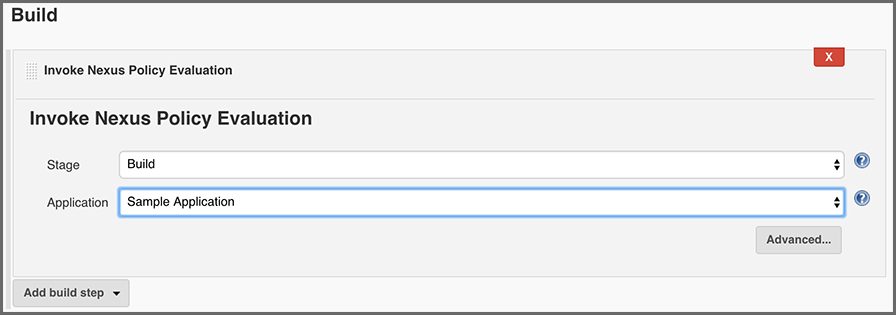
Use the following steps to add a Nexus Policy Evaluation build step to a freestyle or multi-configuration build:
In the Build section of the project configuration screen, click the Add Build Step dropdown button and then select Nexus Policy Evaluation. Enter the following parameters:
Stage: Select Build, Stage Release, Release, or Operate. This controls the stage the policy evaluation is run against on the IQ Server. Only the stages you are licensed to appear in the list.
|
|
|
|
Depending on how your policies are configured, this may impact warning and fail actions. |
Advanced options: A number of additional parameters can be supplied to the plugin using this input field. Typically these parameters are determined by Sonatype support.
Jenkins Pipeline is a suite of plugins that support implementing and integrating continuous delivery pipelines into Jenkins.
For IQ Server, build pipelines allow for policy evaluation at any point during the build, providing a way to gain a bill of materials of components that may not exist during final delivery. In addition, this allows for a policy gate to be set anywhere along the build and delivery process.
Use the following steps to add a Nexus Policy Evaluation build step to a pipeline build:
In the Pipeline section of the project configuration screen, click the Pipeline Syntax link.
In the Steps section of the Snippet Generator window, select the following:
Stage: Select Build, Stage Release, Release, or Operate. This controls the stage the policy evaluation is run against on the IQ Server. Only the stages you are licensed to appear in the list.
|
|
|
|
Depending on how your policies are configured, this may impact warning and fail actions. |
Advanced options: A number of additional parameters can be supplied to the plugin using this input field. Typically these parameters are determined by Sonatype support.
Copy the generated script and paste it into the desired stage of your pipeline script.
An example pipeline script is shown below:
nexusPolicyEvaluation failBuildOnNetworkError: false, iqApplication: 'SampApp', iqStage: 'build',
jobCredentialsId: ''
Utilizing the Nexus IQ for Jenkins 2.x plugin provides full component intelligence and the ability to run policy against your application. Jenkins pipelines let you invoke a build step as part of the build process and use the results for complex workflows. For example, objects returned from a build pipeline step can be used to provide feedback in-application about the process of an evaluation. In the following example, we’ll setup a pipeline build that uses results of a policy evaluation to push data to a GitHub pull request:
First, start a new Jenkins pipeline job for a Maven build. Next, add a build stage that calls Maven clean package, wrapped in a few GitHub status updates. For this example, we’re going to send an update pending when we start the build and have it update the status to indicate if the build succeeded:
stage('Build') {
  postGitHub commitId, 'pending', 'build', 'Build is running'
  sh  "${mvnHome}/bin/mvn clean package"

  if (currentBuild.result == 'FAILURE') {
    postGitHub commitId, 'failure', 'build', 'Build failed'
    return
  } else {
    postGitHub commitId, 'success', 'build', 'Build succeeded'
  }
}
Next, we’ll add a small helper that sends a cURL to the GitHub API to update the status. To do this, set and
declare the gitHubApiToken and project variables and then create the following function:
def postGitHub(commitId, state, context, description, targetUrl) {
  def payload = JsonOutput.toJson(
    state: state,
    context: context,
    description: description,
    target_url: targetUrl
  )
  sh "curl -H \"Authorization: token ${gitHubApiToken}\" --request POST --data '${payload}'
  https://api.github.com/repos/${project}/statuses/${commitId} > /dev/null"
}
After the build, we need to run a Nexus Lifecycle Analysis to determine what the policy evaluation results are. This will let GitHub know Nexus Lifecycle Analysis is running and then do the policy evaluation. The easiest way to do this is using the Jenkins Pipeline Syntax helper to generate a Groovy script.
Click the Pipeline Syntax link on your build configuration screen to open the Pipeline Syntax helper. Select “NexusPolicyEvaluator” as the sample step, select the stage and application you’d like to evaluate against, and then click “Generate Pipeline Script.” Copy the script and paste it into your pipeline script.
In addition to calling the evaluation, you will want to do something with the evaluation results. To do this, set
a policyEvaluationResult variable to the result. Like with the build, you’ll want to look whether the build
result is a failure or not to determine how to update your GitHub pull request. You can also add a link to the
Application Composition Report. Having this available in your pull request lets you go directly to the
evaluation, see why it failed, and perform remediation. An example Nexus Lifecycle Analysis script is shown below:
stage('Nexus Lifecycle Analysis') {
  postGitHub commitId, 'pending', 'analysis', 'Nexus Lifecycle Analysis is running'

  def policyEvaluationResult = nexusPolicyEvaluation failBuildOnNetworkError: false, iqApplication: 'webgoat',
  iqStage: 'build', jobCredentialsId: ''

  if (currentBuild.result == 'FAILURE'){
    postGitHub commitId, 'failure', 'analysis', 'Nexus Lifecycle Analysis failed',
    "${policyEvaluationResult.applicationCompositionReportUrl}"
    return
  } else {
    postGitHub commitId, 'success', 'analysis', 'Nexus Lifecycle Analysis succeeded',
    "${policyEvaluationResult.applicationCompositionReportUrl}"
  }
}
Save your pipeline and then run the build. When the build has completed, you should see successful steps for Build and Nexus Lifecycle Analysis. Going to your GitHub pull request, you will see the successful checks and you can click the “details” link to view your report and address alerts or reevaluate policy.
|
|
|
|
When you access various properties on objects in a pipeline build, Jenkins has security permissions that restrict unauthorized use. In Manage Jenkins navigate to In-process Script Approval and approve scripts (ie application composition report, affected component count) for the analysis to run. |
In the above example, we utilized cURL to interact with the GitHub API and provide analysis feedback to GitHub. Many companies use GitHub for code review, and noting the status of CI builds in your pull request is a powerful analysis tool. In addition to GitHub, you can use the object returned from the policy evaluation with almost anything that provides an interactive API or other Jenkins plugins.
Want to see this in action? Here is a video example.
In addition to the Composition Report URL, you can set the following DTOs:
public class PolicyEvaluationResult {
        private final List<PolicyAlert> policyAlerts;
        private final int affectedComponentCount;
        private final int criticalComponentCount;
        private final int severeComponentCount;
        private final int moderateComponentCount;
        private final boolean reevaluation;
        private final String applicationCompositionReportUrl;
}

public class PolicyAlert {
        private final PolicyFact trigger;
        private final List<? extends Action> actions;
}

public class Action {
        private final String actionTypeId;
        private final String target;
        private final String targetType;
}

public class PolicyFacts {
        private final String policyId;
        private final String policyName;
        private final int threatLevel;
}