The Maven Cookbook
10.9. Configuring a Staging Repository for Deployment in Nexus Professional
There might be any number of reasons why you might want to require your developers to use a staging repository. You might want to make sure that software artifacts contain valid POMs using a Staging Ruleset, or you might want to make sure that your process guarantees that QA has the final decision making authority to either promote or drop a release candidate. Staged software releases are very easy to implement using the Staging Plugin in Nexus Professional. If you want to learn how to make a staged release, you can watch this video. or read the remainder of this section.
First step, is to download Nexus Professional if you don’t already have it installed, you can do so, by going to the Nexus Professional product page and clicking on the download link in the right-hand menu. Once you’ve downloaded Nexus, log in as an administrator as you must have administrative rights to perform the following configuration:
-
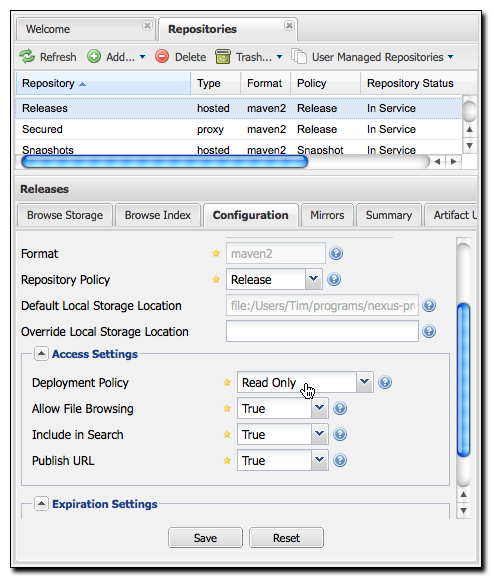
From Nexus, click on the ‘Repositories’ link in left navigation.
-
Click on the repository you want to use, or create one (If you need help with that take a look at the Nexus book, here)
-
Click on the ‘Configuration’ tab.
-
Set the ‘Deployment Policy’ field to "Read Only".
-
Click the Save button.
That is it! Users will not be able to deploy or upload artifacts directly to the repository. All artifacts must be staged and promoted to this repository. For more information on staging and promoting take a look at this, or with the maven plugin, here.
Next, create a staging repository. To create a staging repository:
-
From Nexus, click on the ‘Staging’ link in left navigation.
-
Click the ‘Add’ button then the ‘Staging Profile’ item.
-
Enter the following information:
-
Profile Name: Staging Demo Profile
-
Profile Repository Target: All (Maven2)
-
Staging Repository ID Template: staging-demo
-
Staging Repository Name Template: Staging Demo
-
Staging Repository Template: Default Release Hosted Repository Template
-
Target Groups: Public Releases
-
-
Click the ‘Save’ button

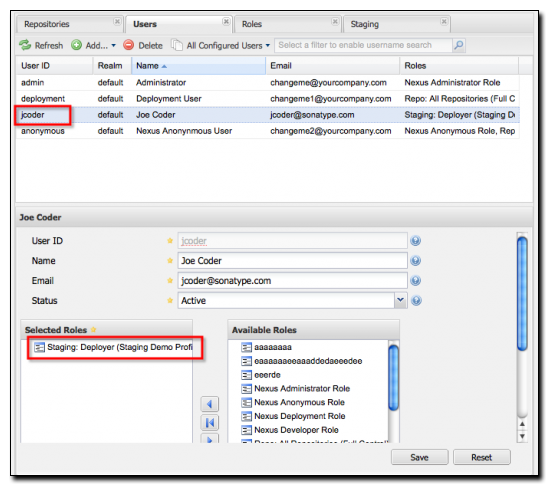
Next, assign new permissions to users who will need to deploy to the staging repository. A new role is created for each staging profile that is created ( in this example the role is ‘Staging Deployer: (Staging Demo Profile)’). Assign the new role to your users. You can find more details on user management, here.